
Introduction to Red Velvet Cake Pops
Why Red Velvet Cake Pops are the Perfect Treat
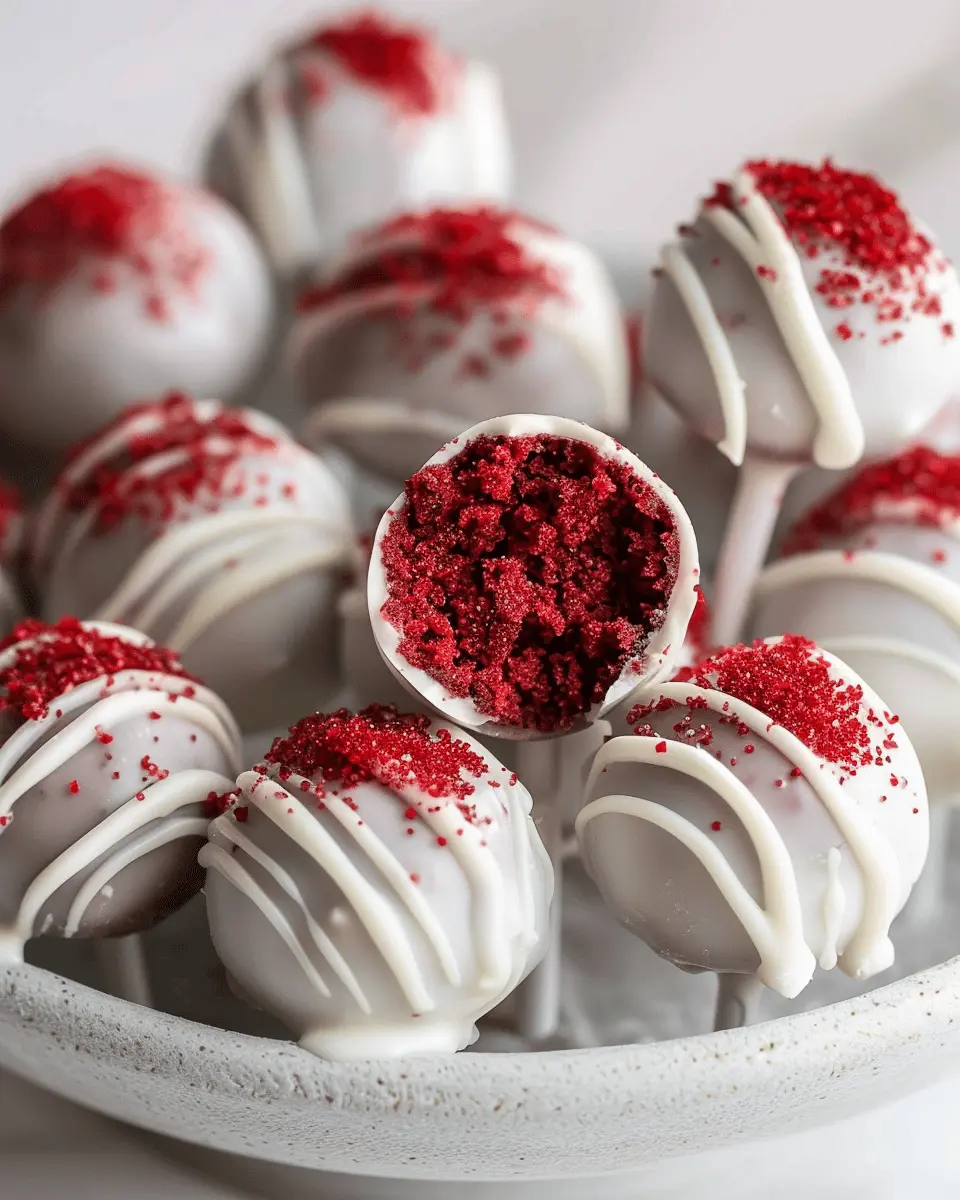
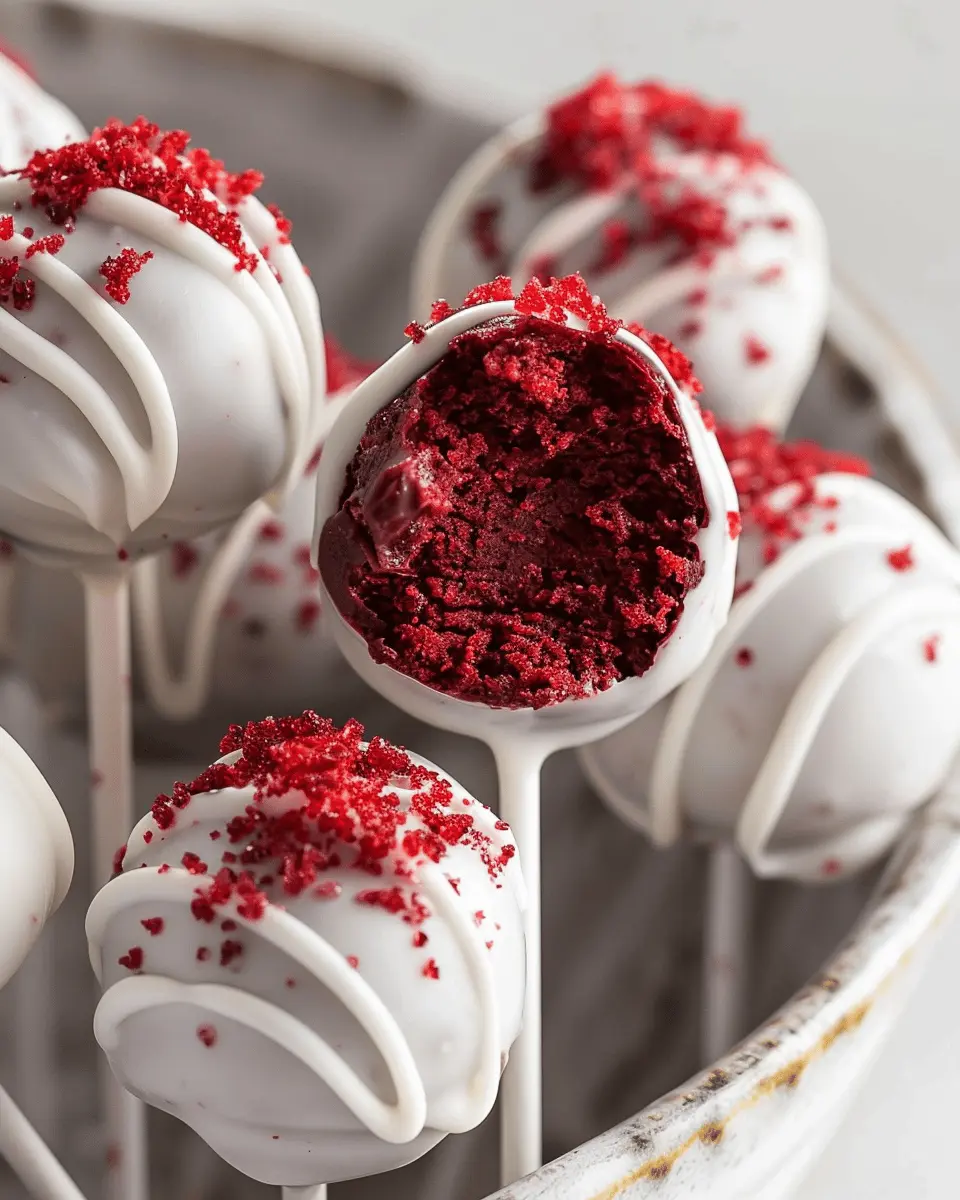
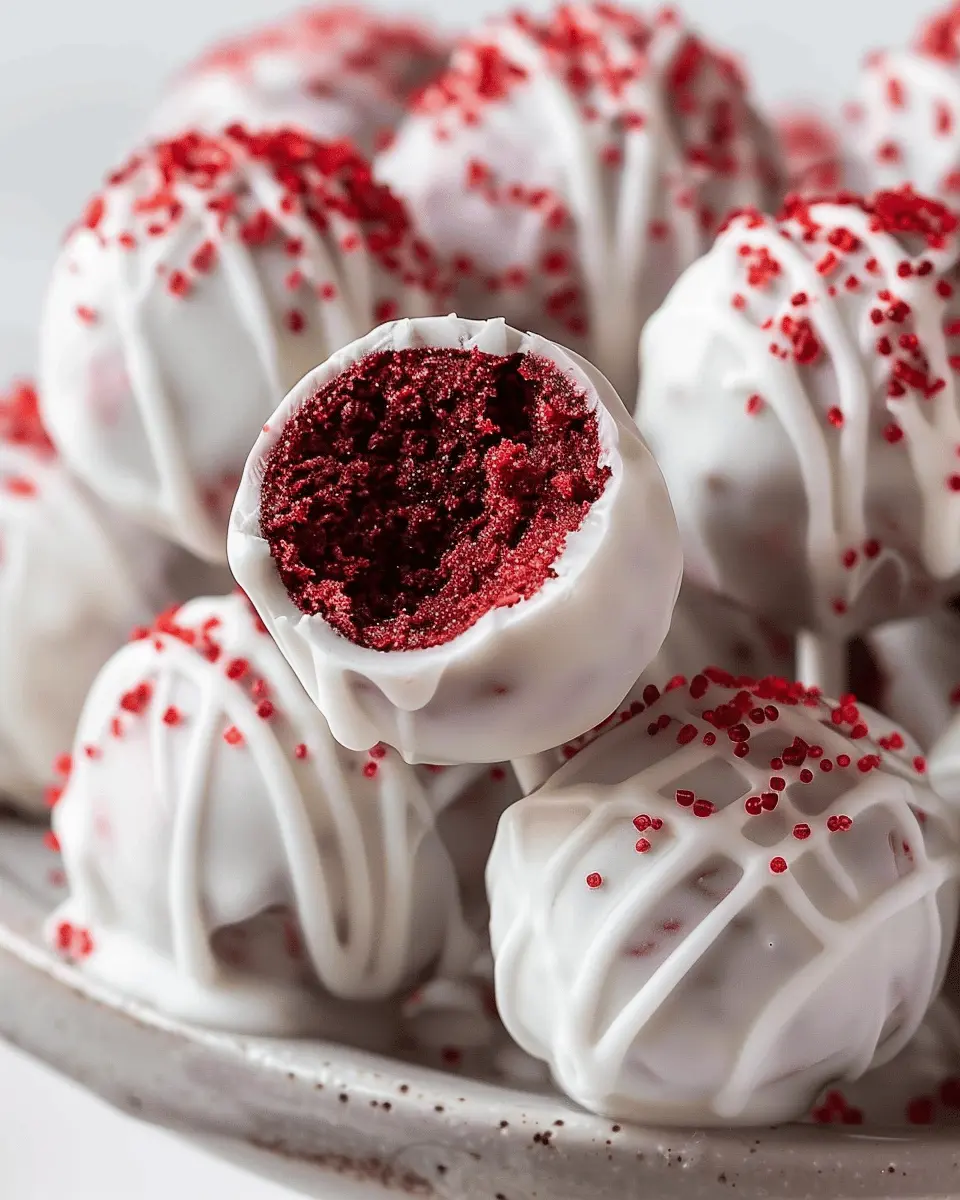
When it comes to dessert, there’s something uniquely delightful about red velvet cake pops. These bite-sized treats not only boast a stunning crimson hue but also combine the rich flavor of classic red velvet cake with the convenience of a pop. Imagine savoring the moistness of red velvet, complemented by creamy frosting, all packed into a fun, hand-held form. What could be better?
One of the charming aspects of red velvet cake pops is their versatility. They’re the perfect treat for any occasion, whether it’s a birthday party, a wedding, or even a casual movie night with friends. And let’s face it—who doesn’t love the fun of snackable desserts? For those looking to impress guests at their next get-together or simply to indulge in a sweet treat after a long day, these cake pops won’t disappoint.
The beauty of red velvet cake pops lies not only in their flavor but in their visual appeal. The vibrant red color paired with elegant white chocolate coating creates an aesthetic that’s hard to resist. According to Nutritional Standards for Desserts, desserts that look good significantly enhance the overall dining experience. These pops are sure to catch the eye of anyone at your next gathering.
What’s more, they can be easily customized! Whether you choose to create a classic version or add unique toppings, such as crushed nuts or colorful sprinkles, the options are nearly endless. Want a hint of cream cheese flavor? You can incorporate it right into your red velvet cake pops as a filling. The creativity involved is one of the reasons why they have become a favorite among both home bakers and pastry chefs alike.
If you’re curious about the small details that elevate these treats—from the best cake and frosting combinations to essential tips for perfecting your pops—stick around! I’ll walk you through a foolproof recipe that guarantees delicious results every time. So, let’s dive into the delicious world of red velvet cake pops and discover how easy they are to make!
Ingredients for Red Velvet Cake Pops
Creating delectable red velvet cake pops is a joyous experience, and it all begins with the right ingredients. Let’s break it down!
Essential Ingredients for Baking
To whip up the cake itself, you’ll need:
- 2 cups all-purpose flour: This forms the base of your cake, providing structure.
- 1 ½ cups granulated sugar: Sweetens the deal, making every bite irresistible!
- 1 cup vegetable oil: Keeps the cake moist and delectable.
- 1 cup buttermilk: Adds that classic tang and rich texture synonymous with red velvet desserts.
- 3 large eggs: Acts as a binding agent, ensuring your pops hold together beautifully.
- 2 tablespoons cocoa powder: A subtle chocolate essence that enhances the red color.
- 1 teaspoon vanilla extract: Infuses warmth and flavor.
- 1 tablespoon red food coloring: The star of the show, making your cake pop vibrant and gorgeous.
- 1 teaspoon baking soda and 1 teaspoon white vinegar: This dynamic duo will give your cake that irresistible fluffiness.
For more details on ingredient precision, check out this baking guide.
Items Needed for Coating
Once you’ve baked the cake, you’ll want to give those pops a professional finish. Gather:
- Chocolate candy melts: These come in various colors – white, dark, or red for a fun twist.
- Sprinkles or crushed nuts: For a tasty decorative touch, add a personalized flair.
- Lollipop sticks: Essential for creating those classic cake pop shapes.
With these ingredients at your fingertips, you’re well on your way to creating delightful red velvet cake pops that will impress friends and family alike! What’s your favorite way to enjoy dessert pops?
Preparing Red Velvet Cake Pops
Making red velvet cake pops is not only about delighting your taste buds but also about the joy of creating something visually appealing. Follow these steps, and you’ll have deliciously rich and chocolatey cake pops to impress your friends and family!
Step 1: Preheat and Prepare
First things first, preheat your oven to 350°F (175°C). While your oven warms up, line a muffin pan with cupcake liners. This ensures even baking and easy removal later on. If you don’t have a muffin pan, a baking tray works just as fine—just remember to adjust your baking time slightly!
Step 2: Mix the Dry Ingredients
In a mixing bowl, whisk together the dry ingredients. You’ll need:
- 2 cups all-purpose flour
- 1 ½ cups granulated sugar
- 1 tablespoon cocoa powder
- 1 teaspoon baking powder
- 1 teaspoon baking soda
- ½ teaspoon salt
Whisking these together ensures that there are no lumps and that all your leavening agents are evenly distributed—this is critical for a fluffy cake.
Step 3: Combine Wet Ingredients
In another bowl, connect with the wet ingredients. You’ll need:
- 1 cup vegetable oil
- 1 cup buttermilk (or make your own with milk and vinegar)
- 2 large eggs
- 2 tablespoons red food coloring
- 1 teaspoon vanilla extract
- 1 teaspoon white vinegar
Stir these together until you have a smooth mixture. The vibrant color of the red velvet cake pops should already be making an appearance! If you’re interested in understanding the science behind baking, check out this informative article from Kitchn.
Step 4: Create the Cake Batter
Now, gently fold the wet ingredients into the dry ones. It’s essential to mix until just combined—the less you overwork the batter, the lighter and fluffier your cake pops will turn out.
Step 5: Bake and Cool the Cupcakes
Pour your batter into the cupcake liners, filling each about two-thirds full. Bake them in the preheated oven for 18-20 minutes or until a toothpick inserted comes out clean. Once done, allow them to cool completely on a wire rack. This cooling step is crucial; if you skip it, the warm cake can cause your frosting to melt later on.
Step 6: Crumble the Cooled Cake
Once your cupcakes have cooled, it’s time for the fun part! Carefully remove the cupcakes from their liners and place them in a large mixing bowl. Break them apart into crumbs; a fork or your hands works great here.
Step 7: Mix in the Cream Cheese
Now, add approximately 8 ounces of softened cream cheese frosting to the crumbled cake. You can make your own or use store-bought if you’re in a hurry. The key is to achieve the right consistency—aim for it to be moldable but not overly wet. If you want specific tips on frosting, check out this expert guide on how to make the best cream cheese frosting from Sally’s Baking Addiction.
Step 8: Shape the Cake Pops
Using your hands, roll the cake mixture into small balls, about one inch in diameter. Place them on a baking sheet lined with parchment paper.
Step 9: Coat and Set
To finish off your red velvet cake pops, melt some chocolate or candy melts according to package instructions. Dip a lollipop stick into the melted chocolate and insert it into each cake ball. This will help the cake pops stay on the stick. Then, dip each cake pop into the chocolate and allow any excess to drip off.
Let them set on a cool surface or even pop them in the fridge for a quick firming if you’re in a hurry. These delightful treats are perfect for any celebration or simply as a sweet indulgence!
In the end, making red velvet cake pops is a fun, interactive experience, whether you’re doing it solo or with friends. Plus, the reward of indulging in these beautifully crafted desserts makes the effort worthwhile! Enjoy the process, and happy baking!
Variations on Red Velvet Cake Pops
Flavors Beyond Red Velvet
While traditional red velvet cake pops are undeniably delicious, why not let your creativity shine by exploring other flavors? Here are some ideas that can take your cake pop game to the next level:
- Chocolate Velvet: For chocolate lovers, opt for a rich chocolate cake base. It’s a surefire way to satisfy those sweet cravings.
- Lemon Velvet: Combine zesty lemon cake with cream cheese frosting for a refreshing twist. The citrusy flavor pairs wonderfully with the sweetness of the cake.
- Carrot Cake: Infuse your pops with the warm spices of carrot cake. Just think about those comforting flavors of cinnamon and nutmeg—perfect for any occasion!
For more ideas on cake flavors, check out this resource that dives deeper into unique cake varieties!
Creative Coatings and Toppings
The real magic of red velvet cake pops often lies in their coatings and toppings. Don’t hesitate to experiment, as the outer layer can enhance both the flavor and the visual appeal.
- Chocolate Coating: A classic choice, you can use dark, milk, or white chocolate to coat your cake pops. Try drizzling different types on top for a stunning look.
- Candy Melts: These come in various colors and flavors, opening up a world of fun. For instance, a vibrant blue or purple can make your cake pops pop at a party!
- Nuts and Sprinkles: Consider rolling your pops in chopped nuts or colorful sprinkles. They add texture and make each bite even more exciting!
Have you tried mixing textures and flavors in one bite? You might be pleasantly surprised! The key is to let your imagination run wild when choosing combinations.
These variations not only keep your cake pops exciting, but they also cater to different tastes and occasions. So, the next time you’re hosting or simply want a delightful treat, think beyond the classic and let your creativity shine!
Cooking Tips and Notes for Red Velvet Cake Pops
Common Mistakes to Avoid
Making red velvet cake pops can seem straightforward, but a few common pitfalls can lead to disappointment. First, don’t overbake your cake. Overbaking results in a dry cake that won’t bind well with your frosting, affecting the final texture. Second, when mixing the cake and frosting, aim for a moist consistency but avoid making it too soggy. Too much frosting can cause your pops to fall off their sticks during dipping. Lastly, ensure your cake is completely cool before mixing; hot cake can melt the frosting and ruin your mixture.
Ingredient Tips for Best Results
To elevate your red velvet cake pops, use high-quality cocoa powder for a richer flavor. Opt for gel food coloring instead of liquid; it gives a more vivid hue without altering the batter’s moisture content. Also, consider using cream cheese frosting instead of traditional buttercream for that classic red velvet taste. Don’t forget to check out this guide on frosting types for expert insight. Lastly, chill your pops before dipping to help them hold their shape better.
Happy baking!
Serving suggestions for Red Velvet Cake Pops
Perfect pairings for your cake pops
When it comes to enjoying red velvet cake pops, think beyond just a sweet treat; they can be the star of any gathering. Pair your cake pops with a rich cup of hot cocoa or a smooth glass of iced coffee to make the flavors dance. You might also consider cream cheese frosting as an optional dip. Its tanginess complements the sweetness perfectly.
For a savory contrast, serve with some crispy Turkey Bacon bites or flavorful Chicken Ham slices. The balance of sweet and savory can create a delightful snacking experience that keeps guests coming back for more.
Creative serving ideas
Presentation is key! Display your red velvet cake pops in a stylish vase filled with colorful sprinkles or in a decorative stand to draw everyone’s attention. You can also wrap each pop in colorful cellophane and tie it with a ribbon for individual gifts.
Whether it’s a birthday party, a cozy gathering, or a relaxed weekend, these easy serving tips will elevate your cake pops from ordinary to extraordinary. For more inspiration, check out this guide on creative dessert presentations. Enjoy your delicious creations!
Time Breakdown for Red Velvet Cake Pops
Preparation Time
Making your red velvet cake pops starts with preparation! You’ll need about 30 minutes to gather your ingredients and mix the batter. This is a great time to put on your favorite playlist and get in the baking zone.
Baking Time
The baking process takes around 25–30 minutes. Keep an eye on the oven! You want those cake layers to rise perfectly without overbaking.
Cooling and Setting Time
After baking, allow the cake to cool completely, which usually takes about 1 hour. Once cooled, it’ll take another 30 minutes or so to set the pops through coating and decorating.
Total Time
In total, you’re looking at around 2 to 2.5 hours from start to finish. A small price to pay for delectable red velvet cake pops that are sure to impress at any gathering. For more tips on cake decorating, check out this resource. Happy baking!
Nutritional Facts for Red Velvet Cake Pops
When indulging in red velvet cake pops, it’s essential to understand the balance of flavor and nutrition they bring to the table. Let’s take a closer look at some key nutritional facts that matter.
Calories
On average, each red velvet cake pop contains about 150-200 calories. While it’s a delightful treat, keeping portions in check can help maintain your dietary goals.
Protein
These delectable bites offer approximately 2-3 grams of protein per pop. Although not a significant protein source, pairing them with other nutritious snacks can enhance your overall intake.
Sugars
A single cake pop can range from 10-15 grams of sugar, contributing to its sweet allure. Knowing the sugar content helps you balance your cravings with healthier options throughout the day.
For more detailed insights on maintaining a balanced diet while enjoying treats, check out the USDA’s MyPlate for great tips. Knowing the nutritional profile of your favorite snacks empowers you to enjoy them mindfully!
FAQs about Red Velvet Cake Pops
Can I make these gluten-free?
Absolutely! You can easily adapt your red velvet cake pops to be gluten-free by swapping out regular flour for a gluten-free all-purpose blend. Look for a mix that includes xanthan gum, as this can help mimic the texture of traditional flour. Just remember to check all your ingredients, including frosting and chocolate, to ensure they’re gluten-free.
How long can I store red velvet cake pops?
If you’re planning to enjoy your red velvet cake pops over several days, you’re in luck! Generally, these delightful treats can be stored in the refrigerator for up to a week. Just make sure to keep them in an airtight container to maintain their freshness. Not planning to eat them soon? You can also freeze them for up to three months! Just remember to defrost them in the fridge overnight before indulging.
What should I do if my coating is too thick?
Thicker coatings can be a bit tricky, but don’t worry! If your chocolate or candy coating seems too thick to work with, here’s a quick fix: Simply melt a small amount of coconut oil or vegetable shortening and stir it into the coating. This should help thin it out, making it much easier to dip your red velvet cake pops. Test it until you achieve a smooth, pourable consistency that coats evenly.
These tips should help you create perfect red velvet cake pops, whether you’re making them for a celebration or just for fun at home. If you have any more questions or need inspiration, don’t hesitate to check out resources from The Spruce Eats or Food Network for even more baking advice!
Conclusion on Red Velvet Cake Pops
There’s something undeniably special about homemade desserts, especially when it comes to sweet delights like red velvet cake pops. These treats can be customized for any occasion, turning a simple recipe into a celebration of flavor and color.
Enjoying Homemade Desserts
Making your own cake pops gives you the chance to express creativity and impress friends. Picture this: a cozy evening at home, friends gathered around, enjoying the decadence of red velvet cake pops together. The joy of sharing desserts is twofold—it’s about the flavors and the memories created.
If you’re eager to explore more about dessert-making, check out The Spruce Eats for additional inspiring recipes. So why wait? Whip up a batch of these delightful treats and savor the sweetness of homemade bliss.
PrintRed Velvet Cake Pops: The Best Indulgent Treat for Any Occasion
These Red Velvet Cake Pops are a deliciously indulgent treat that combine the rich flavors of red velvet cake with creamy frosting, all beautifully coated in chocolate.
- Prep Time: 20 minutes
- Cook Time: 30 minutes
- Total Time: 2 hours
- Yield: 24 cake pops 1x
- Category: Dessert
- Method: Baking
- Cuisine: American
- Diet: Vegetarian
Ingredients
- 1 cup all-purpose flour
- 1 cup granulated sugar
- 1/2 cup unsweetened cocoa powder
- 1 teaspoon baking powder
- 1/2 teaspoon baking soda
- 1/2 teaspoon salt
- 1 cup vegetable oil
- 1 teaspoon vanilla extract
- 1 teaspoon white vinegar
- 2 large eggs
- 1 tablespoon red food coloring
- 8 oz cream cheese, softened
- 1/2 cup powdered sugar
- 1 cup chocolate chips
Instructions
- Preheat your oven to 350°F (175°C) and grease a cake pan.
- In a large bowl, mix the dry ingredients together.
- In another bowl, combine the wet ingredients and mix well.
- Gradually blend the wet ingredients into the dry ingredients until smooth.
- Bake for 25-30 minutes, or until a toothpick comes out clean.
- Let the cake cool completely, then crumble it into a bowl.
- Add cream cheese and powdered sugar to the cake crumbs and mix until well combined.
- Form the mixture into small balls and chill for an hour.
- Melt the chocolate chips and dip the cake pops into the chocolate, covering completely.
- Place the cake pops on a baking sheet until the chocolate hardens.
Notes
- For best results, use high-quality cocoa powder.
- These cake pops can be customized with different colored chocolate coatings.
Nutrition
- Serving Size: 1 cake pop
- Calories: 150
- Sugar: 20g
- Sodium: 80mg
- Fat: 7g
- Saturated Fat: 3g
- Unsaturated Fat: 4g
- Trans Fat: 0g
- Carbohydrates: 21g
- Fiber: 1g
- Protein: 2g
- Cholesterol: 30mg
Keywords: Red Velvet Cake Pops, Cake Pops, Desserts, Treats