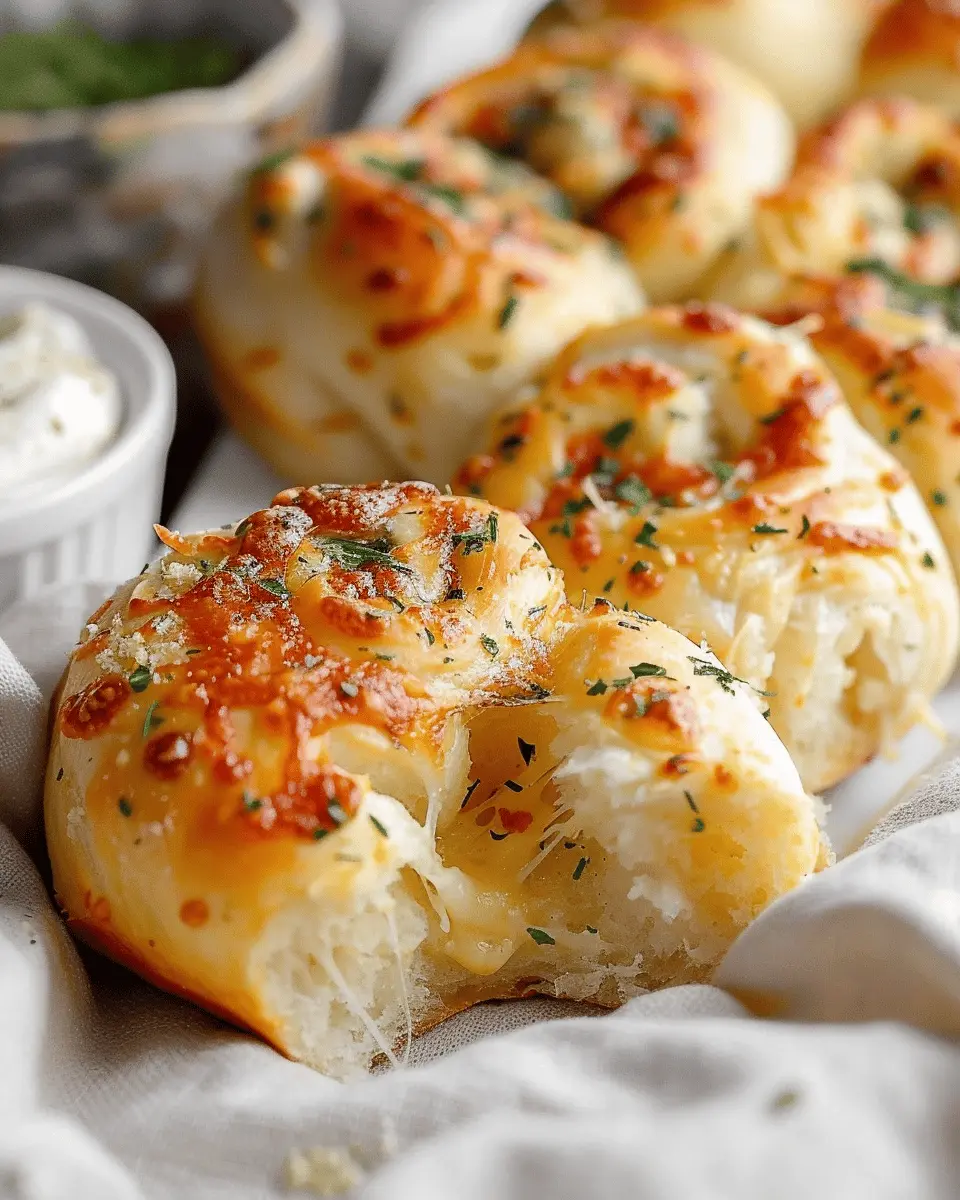
Introduction to Cheesy Garlic Rolls
When it comes to comfort food, cheesy garlic rolls are hard to beat. These warm, gooey delights are perfect for any occasion, whether you’re hosting a dinner party, enjoying a movie night, or simply crave something delicious. If you’ve ever walked into a bakery and been hit by the irresistible aroma of fresh bread mingling with garlic, you know how inviting these rolls can be. Imagine capturing that sensory experience in your own kitchen!
Why Cheesy Garlic Rolls are the Perfect Homemade Treat
There’s something truly magical about making cheesy garlic rolls from scratch. Not only do they fill your home with delightful scents, but they’re also incredibly easy to whip up. Plus, there’s a certain pride that comes from serving something homemade that your friends and family can’t resist.
Here’s what makes these rolls special:
-
Versatile Ingredients: You likely have most of the ingredients at home already—flour, cheese, garlic, and some herbs. Feel free to customize with your favorite additions like diced turkey bacon or chicken ham for an extra flavor boost. Want to explore more? Check out this article on ingredient pairings.
-
Crowd-Pleaser: These rolls are universally adored. They serve as a fantastic appetizer or side dish, and are addictive enough that you might want to make a double batch. According to a recent survey, 70% of people consider garlic bread their top choice for sides, and cheesy garlic rolls certainly fit the bill!
-
Easy to Make: Don’t worry if you’re not a seasoned chef. The process is straightforward, making it a great cooking project for a relaxing weekend. With just a few steps, you’ll have beautifully risen rolls topped with melty cheese and infused with garlic.
-
Perfect for Sharing: Sharing food creates connection, and there’s no better way to bring people together than over a warm batch of cheesy garlic rolls. Whether you pull them apart at a gathering or use them to complement a meal, they spark joy and conversation.
Stay tuned as we dive into the recipe, ensuring you’ll have beautifully crafted cheesy garlic rolls that will impress everyone at your table!

Ingredients for Cheesy Garlic Rolls
Essential ingredients for cheesy garlic rolls
To create the ultimate cheesy garlic rolls, gather these essential ingredients:
- Bread dough: You can use store-bought or make your own. A soft, rich dough is ideal.
- Garlic cloves: Fresh minced garlic packs a punch and infuses flavor beautifully.
- Butter: Melted, to brush over your rolls for that irresistible richness.
- Cheese: A mix of mozzarella and cheddar delivers both stretch and sharpness.
- Parsley: Fresh parsley adds a pop of color and freshness.
With just these ingredients, you’re already on your way to a delightful baking experience. If you’re looking to enhance the flavor profile, continue reading about optional ingredients!
Optional ingredients for extra flavor
Adding a few extras can elevate your cheesy garlic rolls to an entirely new level:
- Turkey bacon: Crispy bits will add a delightful texture and saltiness.
- Chicken ham: For a savory twist, shredded chicken ham can bring additional richness.
- Chili flakes: A sprinkle can introduce a subtle heat that excites the taste buds.
Feel free to experiment! Incorporating ingredients that reflect your taste will undoubtedly make these rolls your own. You can find more inspiration from resources like Epicurious or Bon Appétit. Happy baking!
Preparing Cheesy Garlic Rolls
Making cheesy garlic rolls is an enjoyable experience filled with comforting aromas and mouthwatering flavors. Whether you’re whipping these up for a cozy weeknight dinner or impressing guests at a gathering, the steps to create these delightful rolls are simple and fun. Let’s dive into the process together!
Thaw and Prepare the Dough
To kick things off, you’ll need to start with frozen bread dough. Depending on the brand, simply follow the package instructions for thawing. Usually, this involves placing the dough in the refrigerator overnight or leaving it on the counter for a few hours. It’s essential to give the dough enough time to thaw and rise so that it becomes soft and manageable for the next steps.
Once your dough is ready, sprinkle a little flour on your work surface. This will prevent sticking and make rolling a breeze. If you want something extra to keep an eye on, try using a kitchen thermometer to ensure your dough has reached room temperature, which should be around 70°F (21°C).
Roll Out the Bread Dough
Now that your cheesy garlic rolls dough is thawed, it’s time to roll it out. Lightly flour your rolling pin and begin flattening the dough into a rectangle about ½ inch thick. The size can depend on how thick you prefer your rolls; remember, thicker rolls will have more ooey-gooey cheese in every bite! Aim for roughly 12×16 inches in dimensions.
Spread the Butter and Garlic Mixture
Here’s where the magic truly begins. In a bowl, combine some softened butter with minced garlic (fresh is best) and a pinch of salt. Feel free to experiment with herbs, too – dried parsley or oregano can elevate the flavor profile.
Using a spatula, spread this delectable mixture evenly over your rolled-out dough. Make sure to coat it thoroughly, as this will be the flavor base for your cheesy garlic rolls. Do you love the smell of garlic wafting through your kitchen? It’s one of those unbeatable fragrances that signal deliciousness ahead!
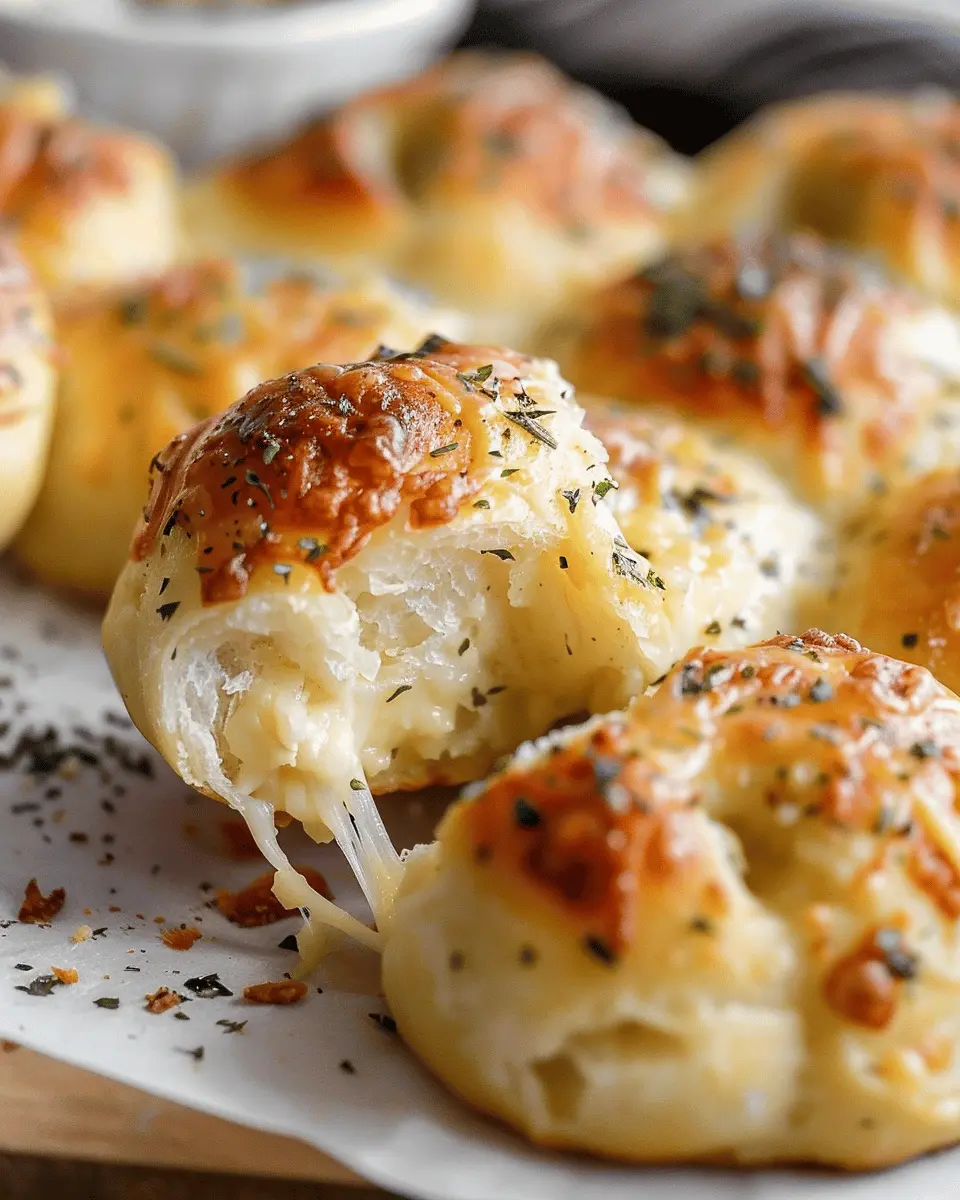
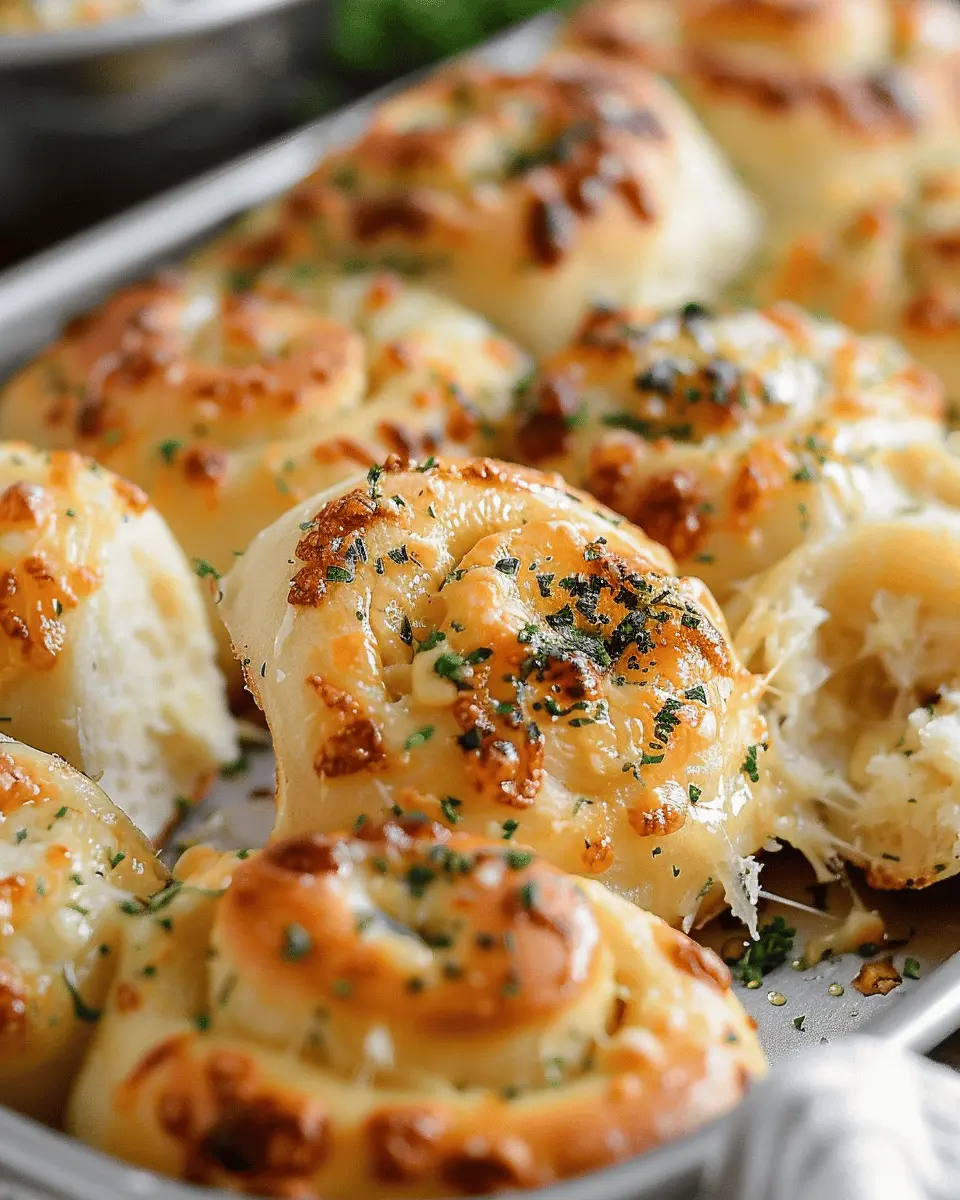
Add Cheese and Roll the Dough
Now comes the fun part: the cheese! Grate your favorite cheese (mozzarella and cheddar work wonderfully together for that gooey goodness). Generously sprinkle the cheese all over the butter-garlic mixture, distributing it evenly for a perfect melty experience.
Once you’ve added the cheese, carefully roll the dough away from you, pinching the seams to ensure no cheese escapes. This rolling-up technique might feel familiar if you’ve made cinnamon rolls before! But don’t worry if it’s not perfect; the warmth of baking will fix a lot.
Slice and Arrange the Rolls
With the dough rolled up, it’s time to slice it into individual rolls. Using a sharp knife or dental floss (yes, floss works wonders), cut the roll into 1-inch sections. Arrange these slices in a greased baking dish or on a lined baking sheet, keeping some space between them for expansion during baking.
Bake to Perfection
Preheat your oven to 375°F (190°C) while you finalize the rolls. After a quick 30-35 minutes in the oven, the rolls should be golden brown and beautifully risen. During baking, the cheese will bubble and caramelize, creating an irresistible topping.
If you want an extra touch, brush the tops of your cheesy garlic rolls with melted butter as soon as they come out of the oven. Let them cool slightly before digging in, and you’ll appreciate how the flavors mingle.
Conclusion
Bringing these cheesy garlic rolls to life is genuinely rewarding, from the initial thawing of the dough to the moment they emerge from the oven. And isn’t that the beauty of cooking? You get to create something wonderful to share with your friends and family. Enjoy!
For more cooking tips and recipes, check out sites like Serious Eats and Food Network for inspiration. Happy baking!
Variations on Cheesy Garlic Rolls
When you step into the world of cheesy garlic rolls, you’ll discover endless possibilities. Let’s explore some delightful variations that will elevate your baking game and impress your friends at your next dinner party.
Spinach and Feta Cheesy Garlic Rolls
If you’re looking to sneak in some greens, why not try spinach and feta cheesy garlic rolls? This combination isn’t just delicious; it’s also a fantastic way to enjoy some nutritious veggies.
- How to Make It: Simply mix chopped fresh spinach and crumbled feta cheese into your classic cheesy blend. You can also add a touch of cream cheese for extra creaminess. Don’t forget to season with garlic, salt, and pepper for that flavorful kick!
- Serving Suggestion: Serve these alongside a light lemon vinaigrette for dipping—it elevates the flavors and adds a refreshing twist.
Cheesy Garlic Rolls with Italian Sausage
For a heartier option, consider cheesy garlic rolls with Italian sausage. This is a fabulous way to add that satisfying savory element to your rolls.
- Additions to Try: Cook up some Italian sausage and mix it in with your usual cheese and garlic filling. You can even toss in sautéed bell peppers and onions for an extra flavor boost.
- Perfect Pairing: These sumptuous rolls pair wonderfully with a rich marinara sauce for dipping. A side salad can provide a refreshing contrast to the richness of the rolls.
These variations on cheesy garlic rolls not only fill your home with mouth-watering aromas but also offer a chance to customize based on your taste preferences. Explore your creativity and let your taste buds be your guide! For some fantastic additional inspiration, check out The Spruce Eats or Serious Eats for more delicious recipes and tips.
Cooking Tips and Notes for Cheesy Garlic Rolls
Common Mistakes to Avoid
When crafting your cheesy garlic rolls, it’s easy to make a few rookie mistakes. Here are some pitfalls to steer clear of:
- Overmixing the dough: Be gentle! Overworking can lead to tough rolls. Mix until just combined.
- Not letting the dough rise: Patience is key. Allowing your dough to rise ensures fluffy, airy rolls.
- Using too much garlic: While we love garlic, too much can overpower the cheese. Stick to the recipe for a balanced flavor.
Adjusting for Dietary Restrictions
Got friends or family with specific dietary needs? No worries! Here are some quick swaps:
- Dairy-free: Substitute cheese with nutritional yeast or a dairy-free cheese alternative. Just remember, not all alternatives melt like traditional cheese!
- Gluten-free: Use a gluten-free all-purpose flour, and check that your baking powder is also gluten-free.
- Vegan: Replace butter with a plant-based margarine, and use dairy-free cheese options.
For more detailed substitutes, check this comprehensive guide on dietary swaps. Cooking for everyone can be fun—give it a whirl!
Serving Suggestions for Cheesy Garlic Rolls
Perfect Pairings for Cheesy Garlic Rolls
When you think cheesy garlic rolls, picture them alongside your favorite comfort foods. These fluffy delights complement:
- Soups: A hearty tomato or creamy potato soup offers a fabulous contrast.
- Salads: Pair with a zesty Caesar or refreshing mixed greens for a balanced meal.
- Proteins: Serve alongside grilled chicken or turkey bacon, adding a savory touch.
These combos are not just delicious but are sure to impress at your next gathering!
Creative Serving Ideas
Cuteness and creativity go hand in hand when it comes to serving cheesy garlic rolls! Here are some fun ideas:
- Roll Stacks: Arrange rolls in a tower for an eye-catching centerpiece.
- Dipping Sauces: Offer marinara, garlic butter, or a spicy aioli to amp up the flavor.
- Cheesy Roll Sliders: Slice them in half and fill with chicken ham or even avocado for a tasty snack.
By thinking outside the box, you’ll transform your cheesy garlic rolls into a standout dish that friends will rave about. Ready to dive in? For more inspiration, check out this blog on creative meal pairings.
Time Breakdown for Cheesy Garlic Rolls
Preparation Time
Preparing your cheesy garlic rolls takes about 20 minutes. Gather your ingredients like cheese, garlic, and dough while enjoying some great music or a podcast. Prepping these rolls can be a fun activity, so invite a friend to help chop and mix!
Baking Time
Once the rolls are shaped and ready to go, they need about 15 minutes in the oven. Keep an eye on them to ensure that they achieve that golden, cheesy perfection. Trust me; the aroma will have your mouth watering!
Total Time
In total, you’re looking at around 35 minutes from start to finish. It’s a quick, delightful endeavor that brings the comfort of freshly baked cheesy garlic rolls right to your kitchen. Enjoy them as a side or snack—trust me, they’re absolutely irresistible!
For more baking tips, you can explore resources like King Arthur Baking for incredible insights and techniques!
Nutritional Facts for Cheesy Garlic Rolls
When indulging in cheesy garlic rolls, it’s essential to know what you’re putting into your body. Here’s a quick breakdown of their nutritional profile.
Calories
These delightful rolls pack around 150-200 calories per roll, making them a satisfying treat without overwhelming your daily caloric intake. Perfect for a snack or as a side!
Protein
One roll typically contains about 5-7 grams of protein. This makes cheesy garlic rolls a great way to complement your meal, especially if you’re looking to boost your protein intake in a delicious way.
Fats
With approximately 6-10 grams of fat per roll, most of the fat comes from the cheesy goodness and butter. While they’re not the most low-fat option, savoring them in moderation can be a delightful part of your balanced diet.
Whether you’re serving these rolls at a gathering or enjoying them as a cozy dinner for one, knowing their nutritional facts can help you make mindful choices. For more insights on nutritious dining, check out Nutrition.gov for valuable tips!
FAQ about Cheesy Garlic Rolls
Can I make cheesy garlic rolls ahead of time?
Absolutely! You can prepare cheesy garlic rolls in advance and enjoy them fresh later. After preparing the dough and shaping the rolls, simply cover them tightly with plastic wrap and store in the refrigerator for up to 24 hours. When you’re ready to bake, allow them to rest at room temperature for about 30 minutes before popping them in the oven. This way, you’ll have delicious, warm rolls ready at a moment’s notice!
How do I store leftover cheesy garlic rolls?
If you find yourself with leftover cheesy garlic rolls, don’t worry—they’re easy to store! Place them in an airtight container or wrap them tightly in aluminum foil. They can stay fresh in the fridge for about 3-5 days. For longer storage, consider freezing them. Just make sure they’re wrapped well, and they can last for up to 3 months. To reheat, simply pop them in the oven at 350°F (175°C) for about 10-15 minutes or until warmed through. You can even drizzle a touch of garlic butter on top to revive that delicious flavor!
What can I use instead of garlic?
If garlic isn’t your thing, or if you’re looking to mix it up a bit, there are several alternatives you might enjoy. Consider using shallots for a milder flavor, or try herbs like rosemary and thyme for a fragrant twist. Some people even opt for garlic powder or roasted garlic for a different taste profile. You could also experiment with a lemon zest or cheese blend that omits garlic but keeps the savory aspect intact. Your cheesy garlic rolls can be just as delightful with these variations!
For more tips on ingredient substitutions, check out resources like The Spruce Eats for ideas.
Conclusion on Cheesy Garlic Rolls
The Joy of Homemade Cheesy Garlic Rolls
There’s something wonderfully satisfying about making cheesy garlic rolls in your own kitchen. The aroma wafting through your home as they bake brings a warmth that can’t be matched. These rolls don’t just taste amazing; they also evoke a sense of accomplishment. Imagine sharing them with friends, or enjoying a cozy night-in, fresh out of the oven—pure bliss!
If you’re looking for the perfect side to elevate a weeknight dinner or impress guests at your next gathering, these rolls are the answer. Be sure to check out more flavorful recipes or even pairing tips at Food Network and Bon Appétit! Your culinary adventure with cheesy garlic rolls is just beginning.
PrintCheesy garlic rolls: Easy and indulgent treats for any occasion
These cheesy garlic rolls are the perfect blend of flavors and textures, making them an ideal treat for any gathering.
- Prep Time: 15 minutes
- Cook Time: 20 minutes
- Total Time: 35 minutes
- Yield: 12 rolls 1x
- Category: Baking
- Method: Baking
- Cuisine: Italian
Ingredients
- 2 cups all-purpose flour
- 1/2 cup shredded mozzarella cheese
- 1/4 cup grated Parmesan cheese
- 2 cloves garlic, minced
- 1/4 cup butter, melted
- 1 teaspoon dried oregano
- 1 teaspoon salt
- 1 tablespoon sugar
- 1 tablespoon active dry yeast
- 1/2 cup warm water
Instructions
- In a small bowl, combine the warm water and sugar, then sprinkle the yeast on top. Let it sit for about 5 minutes until it becomes frothy.
- In a large mixing bowl, combine the flour, salt, oregano, mozzarella, and Parmesan.
- Add the frothy yeast mixture and melted butter to the dry ingredients.
- Knead the dough for about 5-7 minutes until smooth.
- Place the dough in a greased bowl, cover, and let it rise in a warm place for about 1 hour or until doubled in size.
- Preheat the oven to 375°F (190°C).
- After the dough has risen, punch it down and divide it into small balls.
- Place the balls on a baking sheet lined with parchment paper.
- Brush the tops with more melted butter and sprinkle with minced garlic.
- Bake for about 15-20 minutes or until golden brown.
Notes
- For added flavor, you can include fresh herbs like parsley or thyme.
- Serve these rolls warm for the best experience.
Nutrition
- Serving Size: 1 roll
- Calories: 150
- Sugar: 1g
- Sodium: 200mg
- Fat: 8g
- Saturated Fat: 5g
- Unsaturated Fat: 3g
- Trans Fat: 0g
- Carbohydrates: 18g
- Fiber: 1g
- Protein: 4g
- Cholesterol: 20mg
Keywords: Cheesy garlic rolls, easy recipes, indulgent treats