
Introduction to Chocolate Cake Pops
The Irresistible Charm of Chocolate Cake Pops
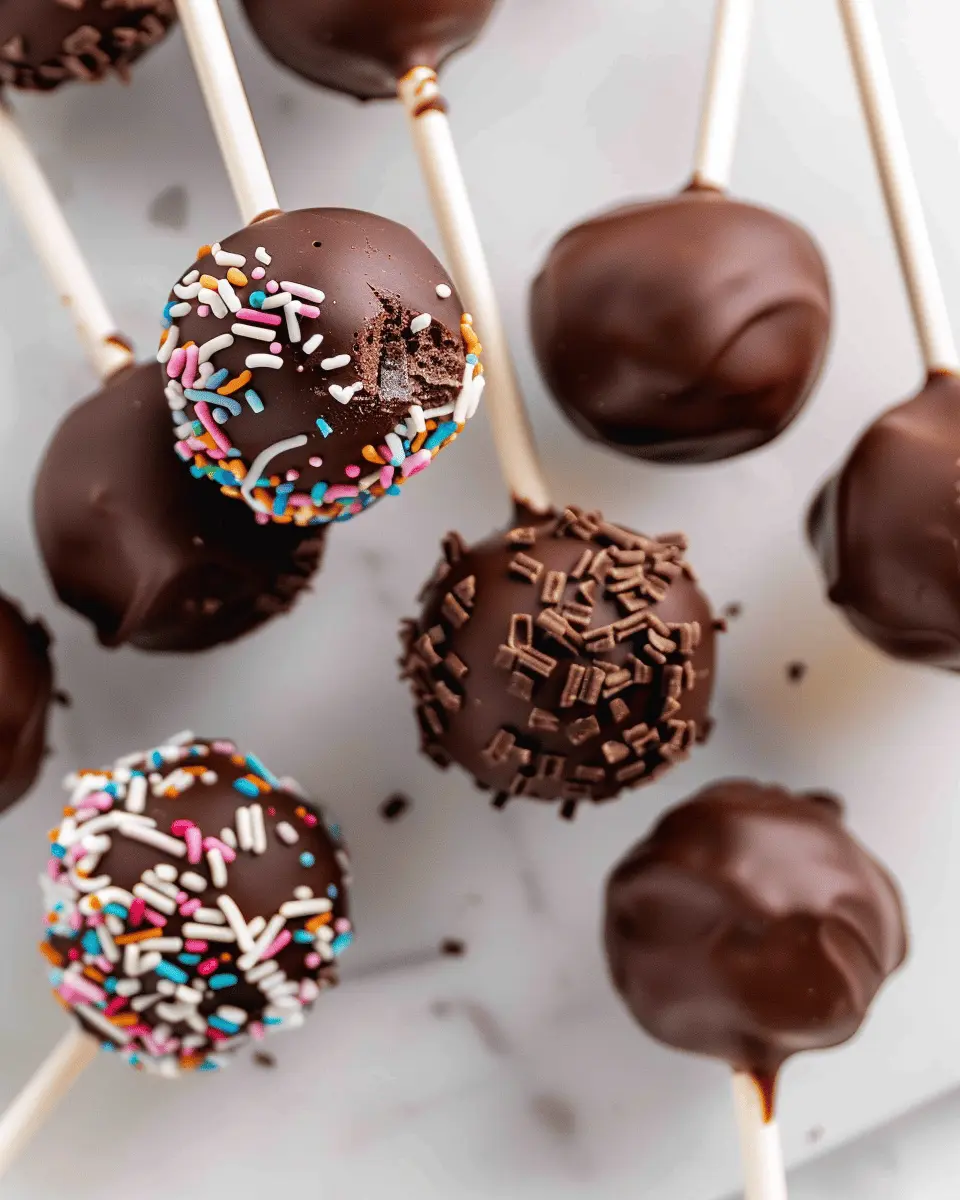
Have you ever stumbled upon a dessert that makes you feel like a kid in a candy store? For many, that delightful treat is none other than chocolate cake pops. These sweet bites combine the rich, decadent flavors of chocolate cake with a fun, easy-to-eat format that appeals to both kids and adults alike. They are perfect for birthday parties, festive celebrations, or even as a special treat just because!
What makes chocolate cake pops truly special? Well, they are essentially small spheres of moist chocolate cake mixed with creamy frosting, all skillfully coated in a layer of chocolate or candy melts. The result? A portable version of your favorite cake that’s both visually appealing and incredibly delicious. Whether you’re making them for a crowd or just for yourself, chocolate cake pops are incredibly versatile; you can customize them in endless ways.
For a little inspiration, check out sites like The Spruce Eats for unique flavor combinations and decorating ideas. From festive sprinkles to a variety of toppings, the creative possibilities are endless!
When it comes to making these little wonders, it’s easier than you might think. Most recipes require only a few ingredients: cake, frosting, chocolate for coating, and of course, some lollipop sticks. You can even use store-bought cake and frosting if you’re short on time—no judgment here!
You might be wondering, what’s the best occasion to whip up a batch of chocolate cake pops? Honestly, any occasion is perfect! Feel free to surprise colleagues at the office, bring them to a friend’s gathering, or simply savor them during a cozy movie night at home.
So, if you’re ready to create a sweet sensation that will have everyone raving, keep reading. Grab your apron, and let’s dive into the delicious world of chocolate cake pops!

Ingredients for Chocolate Cake Pops
Creating delicious Chocolate Cake Pops starts with the right ingredients. Let’s break down what you’ll need to ensure your cake pops are a hit at any gathering!
Essential Ingredients for the Cake
To create a moist and flavorful cake base, gather the following essentials:
- All-purpose flour: About 2 cups for that perfect structure.
- Granulated sugar: 1 ½ cups to bring out the sweetness.
- Unsweetened cocoa powder: ¾ cup for a rich chocolate flavor.
- Baking powder and baking soda: 1 teaspoon each to help the cake rise.
- Salt: Just a pinch to balance the sweetness.
- Eggs: 2 large eggs add moisture and richness.
- Buttermilk: 1 cup ensures your cake is tender and flavorful.
- Vegetable oil: ½ cup keeps your cake moist.
Ingredients Needed for Frosting
To bring it all together, you’ll need:
- Butter: ½ cup, softened to create a smooth and creamy frosting.
- Powdered sugar: 2 cups for that sweet finish.
- Cocoa powder: ¼ cup for extra chocolate goodness.
- Vanilla extract: 1 teaspoon adds depth to your frosting.
Materials for Coating and Decoration
Lastly, let’s not forget the fun part—coating your Chocolate Cake Pops! You’ll want:
- Chocolate melting wafers: 2 cups in your choice of dark, milk, or white chocolate.
- Sprinkles, crushed nuts, or coconut: For topping each pop, adding a touch of texture.
With these ingredients, you’re well on your way to making delightful Chocolate Cake Pops that everyone will love! For more cake inspiration, check out this baking guide for tips on achieving that perfect bake.
Step-by-step Preparation of Chocolate Cake Pops
Creating your own Chocolate Cake Pops is not only a fun activity but also a fantastic way to enjoy a perfectly indulgent treat. Whether you’re planning for a party or just want to indulge your sweet tooth, follow these simple steps, and you’ll have delicious cake pops ready to impress.
Gather and Measure Your Ingredients
Before diving into the baking process, it’s essential to gather everything you need. A well-prepared kitchen makes for a smooth experience!
You will need:
- 1 box of chocolate cake mix (plus ingredients as required)
- 1 can of chocolate frosting
- 12 oz of chocolate melting wafers (milk or dark chocolate)
- Lollipop sticks
- Sprinkles or other decorations
Make sure to check out this resource on baking essentials to ensure you have all the necessary tools and ingredients!
Bake the Chocolate Cake
Now that you have your ingredients at the ready, let’s get baking!
- Preheat Your Oven: First, preheat your oven according to the cake mix instructions—typically around 350°F (175°C).
- Prepare the Cake Pan: Grease and flour a 9×13-inch baking pan.
- Mix and Bake: Follow the instructions on the cake mix to combine your ingredients, pour the batter into the pan, and bake until a toothpick comes out clean (usually about 30-35 minutes).
Don’t forget to let it cool completely before moving on to the next step!
Prepare the Chocolate Frosting
While your cake is cooling, it’s time to prepare the frosting. If you’re using store-bought frosting, you can skip straight to the next step.
If you’re feeling adventurous, try making your own! Here’s a simple recipe:
- 1 cup unsalted butter, softened
- 3 cups powdered sugar
- ½ cup cocoa powder
- 1 tsp vanilla extract
- 2-4 tbsp milk to achieve desired consistency
Mix these ingredients until smooth and creamy, and set aside.
Crumble the Cake and Mix with Frosting
Once your chocolate cake has cooled, take a fork or your hands and crumble it into a large bowl.
- Add the Frosting: Incorporate your chocolate frosting into the crumbled cake, mixing until evenly combined. You’re looking for a consistency that holds together—too much frosting will make it mushy, while too little will crumble apart.
You might even find a great satisfaction in this step; it’s like creating a sweet masterpiece!
Form the Cake Balls
Using your hands, scoop portions of the cake mixture and roll them into balls, about 1 inch in diameter. Make sure your hands are a bit moist to prevent sticking.
- Tip: Try using a cookie scoop for even sizes!
Chill the Cake Balls
Place the formed cake balls on a parchment-lined tray and pop them into the refrigerator for at least 30 minutes. This helps the mixture firm up, making it easier to dip later.
Melt the Coating and Dip the Cake Balls
After chilling, it’s time to melt the chocolate coating.
- Melt the Chocolate: Use a microwave or a double boiler to melt your chocolate wafers, stirring until smooth.
- Dip the Cake Balls: Take a lollipop stick and dip it into the melted chocolate, then insert it about halfway into a cake ball. This helps anchor the stick. Dip the entire ball into the melted chocolate until covered, allowing any excess to drip off.
Decorate and Let Set
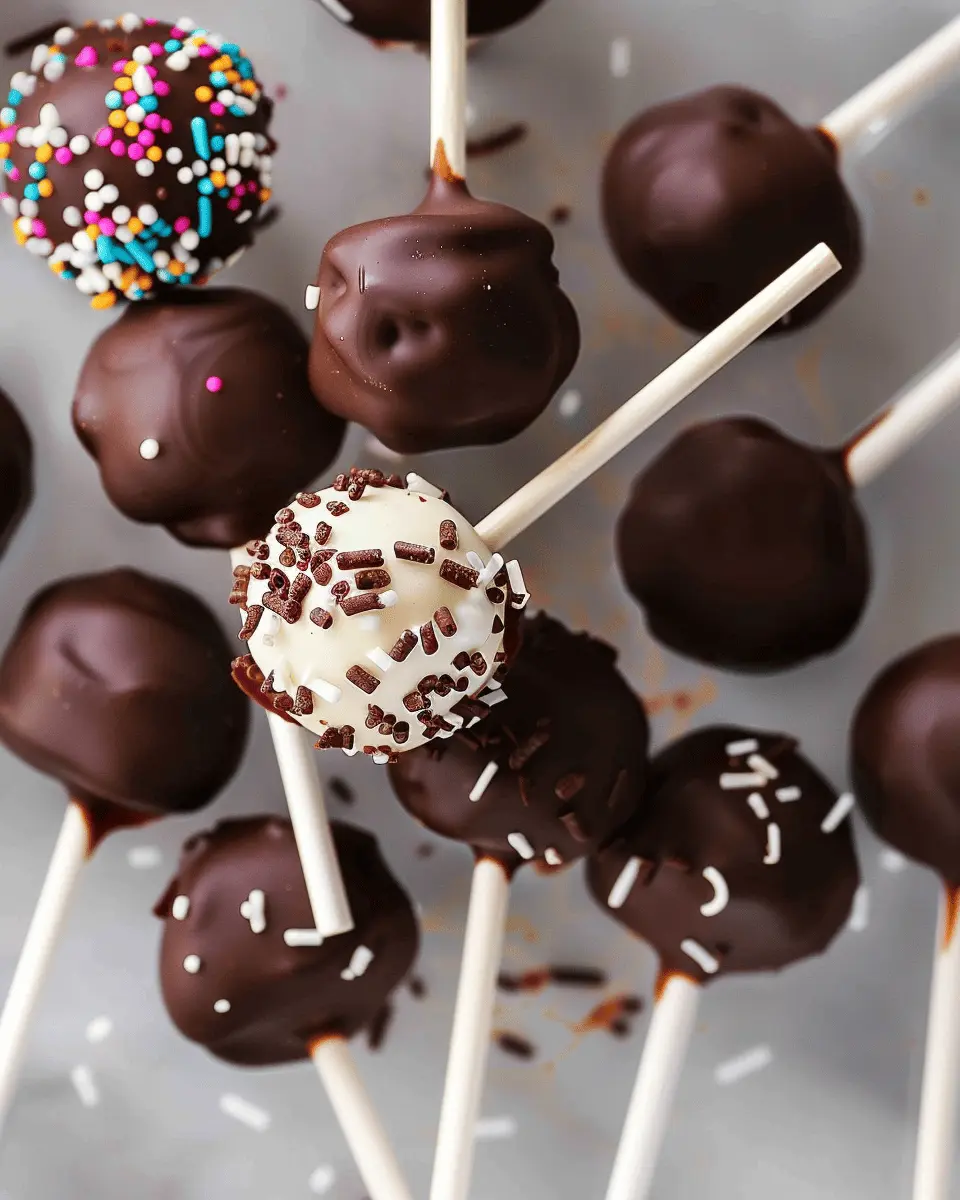
While the chocolate coating is still warm, sprinkle your favorite toppings—think colorful sprinkles, crushed nuts, or even drizzling with white chocolate for flair!
- Setting: Place the finished cake pops upright in a foam block or use a cupcake tray to hold them until the coating hardens.
By following these steps, you’ll create delightful Chocolate Cake Pops that not only taste incredible but look great too. Enjoy your sweet creations, and don’t be surprised if they disappear quickly! For more baking tips, consider exploring BBC Good Food for additional inspiration and expertise.
Variations on Chocolate Cake Pops
Fun Flavor Variations to Try
While chocolate cake pops are delicious on their own, experimenting with different flavors can elevate your dessert game significantly. Here are some tasty variations to consider:
- Mint Chocolate Cake Pops: Add a few drops of peppermint extract to your frosting for a refreshing twist. It’s the perfect treat for mint lovers!
- Espresso Delight: Mix instant espresso powder into your cake batter to infuse a rich coffee flavor. Pair it with chocolate coating for that perfect pick-me-up.
- Peanut Butter Bliss: Swirl in creamy peanut butter into the cake mixture or as the coating. This classic combination never goes out of style!
- Spicy Chocolate: Incorporate a hint of cayenne pepper into your chocolate or cake batter for an unexpected kick that’ll surprise your taste buds.
If you’re curious about more unique flavors, check out expert flavors at sources like The Spruce Eats.
Creative Decorative Ideas for Cake Pops
Decorating your chocolate cake pops is where the fun truly begins! Here are some creative ideas to make them visually appealing:
- Colorful Drizzles: Use white chocolate or colored candy melts to create fun drizzles over your cake pops. This is a simple way to add color and flair.
- Sprinkles Galore: Dipping the tops in various sprinkles not only enhances flavor but also adds a festive look—perfect for birthdays or celebrations.
- Themed Decorations: If you’re making them for a holiday, consider using themed decorations. For Halloween, try spider rings, or for Christmas, use edible glitter and snowflake sprinkles.
- Cake Pop Stands: Presentation matters! Invest in a cake pop stand or make your own using a block of foam. This way, your pops will look stunning no matter the occasion.
With these tips, your chocolate cake pops will not only taste great but also impress everyone at your next gathering. Enjoy experimenting!
Cooking Tips and Notes for Chocolate Cake Pops
Common mistakes to avoid
When making Chocolate Cake Pops, the journey can be a bit tricky if you’re not careful. One common mistake is overbaking the cake, leading to a dry end product. Remember to check your cake regularly, and let it cool completely before crumbling. Additionally, using too much frosting can make your mixture too soggy—less is more! Striking the right balance for your cake mix is essential for a perfect pop.
Tips for achieving the perfect coating
For that beautiful coating on your Chocolate Cake Pops, melting your chocolate can make a world of difference. Use high-quality chocolate and ensure it’s tempered properly for a smooth finish. Adding a small amount of vegetable oil can also help thin it out for better dipping.
Don’t rush the dipping process. Give each pop a gentle swirl in the melted chocolate and let the excess drip off. You might even consider testing a few practice pops first if you’re feeling unsure. Happy baking!
For more tips on melting chocolate, check out Serious Eats for a detailed guide.
Serving Suggestions for Chocolate Cake Pops
Creative ways to present chocolate cake pops
When it comes to presentation, chocolate cake pops can steal the spotlight at any gathering. Consider placing them in a stylish mug or decorative vase filled with rice or candy for a fun display. Wrapping them individually in clear cellophane tied with a ribbon can also create an elegant touch. For an extra flourish, you could even dip them in a variety of toppings like sprinkles, crushed nuts, or even edible gold glitter!
Occasions that call for cake pops
Chocolate cake pops serve as delightful treats for a range of occasions:
- Birthdays: A crowd-pleaser for kids and adults alike.
- Weddings: Perfect as wedding favors or dessert table additions.
- Baby showers: Customize with colors to match the theme.
- Office parties: Easy to grab and enjoy during breaks.
These versatile sweets aren’t just delectable; they’re also a visual treat that can enhance any event. When planning your next celebration, consider the joyful presentation and adaptability of chocolate cake pops. There’s something undeniably special about them that can make any gathering memorable!
For further inspiration, check out this article on dessert presentations.
Time Breakdown for Chocolate Cake Pops
Preparation Time
Creating your delightful Chocolate Cake Pops starts with about 20 minutes of prep work. Gather your ingredients and tools, ensuring you have everything from baking essentials to fun sprinkles for decoration. This is the perfect time to put on your favorite playlist and get into the baking groove!
Baking and Chilling Time
Baking the cake itself usually takes around 30 to 35 minutes. Once baked, you’ll want to let it cool for another 30 minutes before crumbling. After crumbling, you’ll mix in your frosting and roll into balls, which you’ll need to chill for about 30 minutes to firm up.
Total Time Spent
When you add it all up, you’ll spend roughly 1.5 to 2 hours making these decadent Chocolate Cake Pops. It’s a small investment of time for a treat that’s sure to wow friends and family. Plus, don’t forget to save some for yourself!
For more baking tips and tricks, check out The Kitchn for expert advice on perfecting your cake and pop-making skills.
Nutritional Facts for Chocolate Cake Pops
Calories per cake pop
When it comes to indulging in chocolate cake pops, you’ll be pleased to know that each pop typically contains around 150-200 calories. While they are undeniably a treat, moderation is key! Enjoying one or two at a party can be a delicious way to satisfy your sweet tooth without completely derailing your day.
Key nutrients in chocolate cake pops
These delightful bites aren’t just empty calories. Here’s what you can expect in terms of nutritional content:
- Carbohydrates: About 20g, mainly from sugar and flour, providing energy.
- Fat: Around 7g, which contributes to their moist texture.
- Protein: Roughly 2-3g, thanks to the ingredients like eggs and chocolate.
- Vitamins and minerals: Depending on your recipe, they can offer small amounts of iron and calcium.
For more in-depth nutritional guidance, check out resources like the USDA FoodData Central which can provide detailed insights into ingredients you’re curious about. These little treats can fit into a balanced diet if you approach them with a mindful mindset!
FAQ about Chocolate Cake Pops
Can I make cake pops without frosting?
Absolutely! While frosting is commonly used to bind the cake together in traditional chocolate cake pops, you can certainly create a delicious version without it. Using ingredients like cream cheese or melted chocolate can provide the necessary moisture without overwhelming sweetness. If you’re exploring this option, try adding a few tablespoons of milk or a nut butter for added richness.
How do I store leftover cake pops?
To keep your chocolate cake pops fresh, store them in an airtight container at room temperature for up to three days. If you want to extend their shelf life, you can refrigerate them for up to two weeks. Just remember to let them come to room temperature before serving for the best flavor and texture. If you’re preparing them for a special occasion, freezing is a great alternative as they can stay fresh for about a month. Just take them out a few hours before you plan to enjoy them!
What are some gluten-free alternatives for this recipe?
For a gluten-free spin on chocolate cake pops, you can substitute regular flour with gluten-free all-purpose flour or almond flour. Both options work well to maintain the texture while still delivering that rich chocolate flavor. Brands like Bob’s Red Mill provide excellent gluten-free mixes that can simplify your baking process.
Are you ready to experiment with these techniques and flavor adjustments? Don’t hesitate to share your experiences or tweaks! You can find even more tips and tricks for cake pops on resources like The Kitchn or Serious Eats. Enjoy crafting your delightful treats!
Conclusion on Chocolate Cake Pops
The joy of homemade chocolate cake pops
There’s something undeniably delightful about creating your own Chocolate Cake Pops at home. Not only do they make for a beautiful centerpiece at gatherings, but they also offer a creative outlet. Imagine the satisfaction of crafting these sweet treats from scratch—perfectly moist cake combined with rich chocolate, all on a fun stick!
Each bite bursts with flavor, evoking a sense of nostalgia for childhood treats. Plus, they’re incredibly versatile, allowing you to customize flavors and decor to fit any occasion. Need a quick gift? Wrapped chocolate cake pops are sure to impress! Dive into this sweet adventure and discover the joy of homemade treats. For more tips on creating delicious cake pops, check out this helpful guide for inspiration.
PrintChocolate Cake Pops: Easy Indulgence for Sweet Cravings

Delight in the rich flavors of chocolate cake pops, perfect for satisfying your sweet cravings in a fun and easy way.
- Prep Time: 30 minutes
- Cook Time: 30 minutes
- Total Time: 1 hour
- Yield: 24 cake pops 1x
- Category: Dessert
- Method: Baking
- Cuisine: American
- Diet: Vegetarian
Ingredients
- 1 box chocolate cake mix
- 1 cup water
- 1/2 cup vegetable oil
- 3 large eggs
- 1 cup chocolate frosting
- 12 oz chocolate candy coating
- sprinkles (optional)
Instructions
- Preheat the oven to 350°F (175°C).
- Prepare the chocolate cake mix according to the package instructions with water, vegetable oil, and eggs.
- Bake the cake in a 9×13 inch pan for the recommended time.
- Once baked, let the cake cool completely.
- Crumb the cooled cake in a large bowl and mix in the chocolate frosting until well combined.
- Form the mixture into small balls and place them on a baking sheet lined with parchment paper.
- Refrigerate the cake balls for about 30 minutes.
- Dip each cake ball into the melted chocolate coating, allowing excess to drip off.
- Sprinkle with optional toppings and let cool until set.
Notes
- Use high-quality chocolate for better flavor.
- Experiment with different toppings for variety.
Nutrition
- Serving Size: 1 cake pop
- Calories: 150
- Sugar: 20g
- Sodium: 150mg
- Fat: 7g
- Saturated Fat: 3.5g
- Unsaturated Fat: 2g
- Trans Fat: 0g
- Carbohydrates: 20g
- Fiber: 1g
- Protein: 2g
- Cholesterol: 25mg
Keywords: Chocolate Cake Pops