Introduction to Halloween Graveyard Dirt Cups
Halloween is the perfect time to unleash your creativity in the kitchen. One of the most delightfully spooky treats you can whip up is Halloween Graveyard Dirt Cups. These festive desserts are not only easy to make but are also a hit at any Halloween gathering. Whether you’re hosting a party or just looking to impress your friends with something unique, these cups serve as both a treat and a conversation starter.
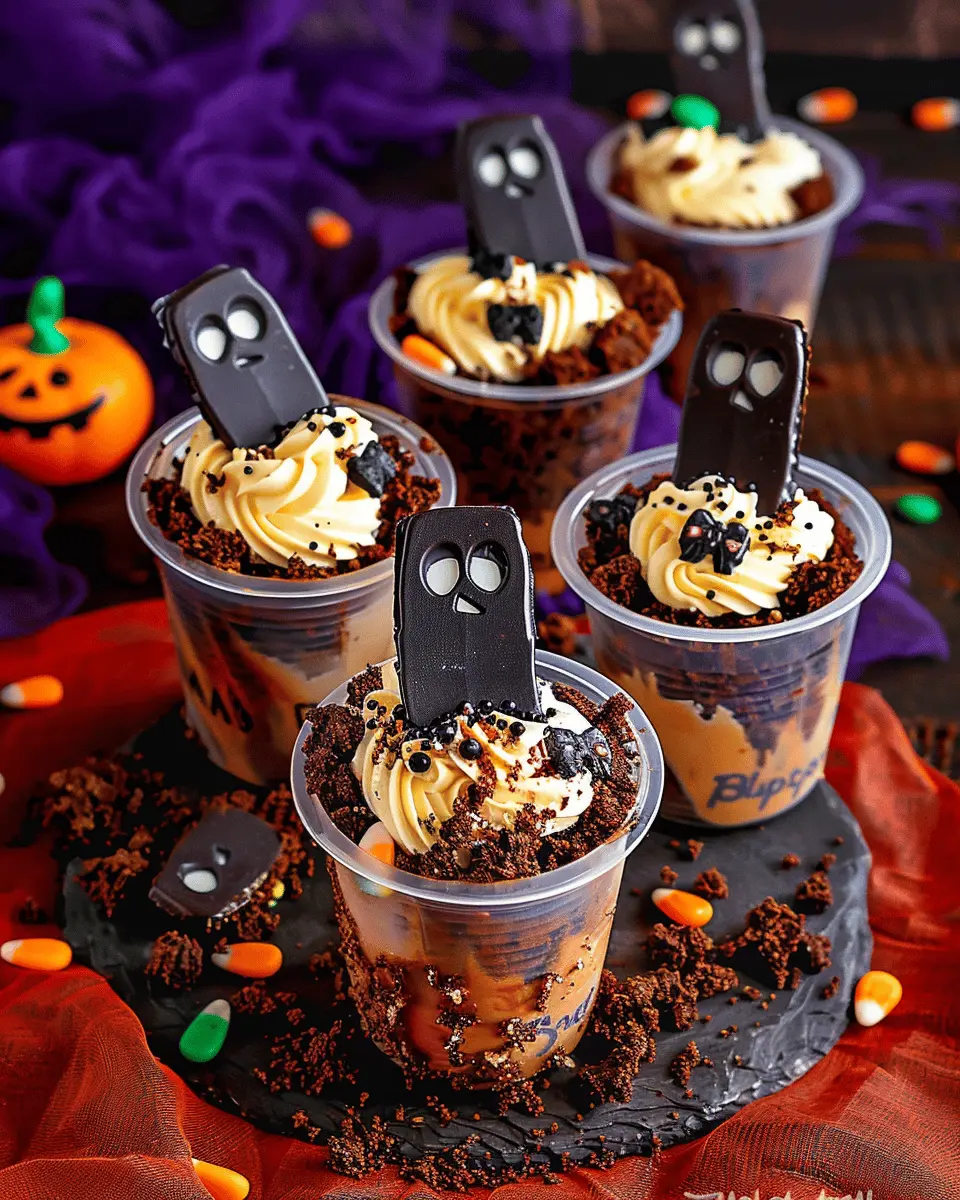
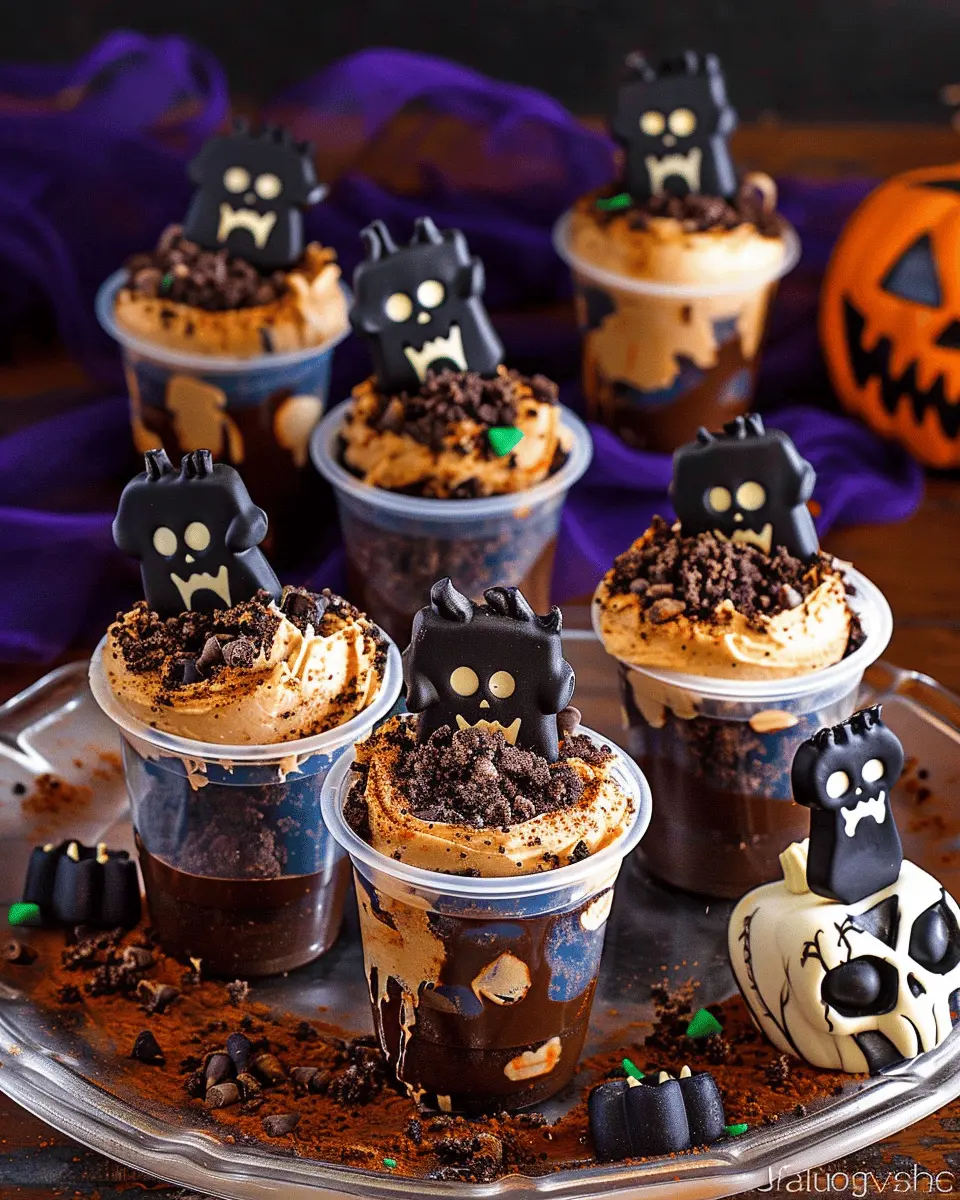
So, what exactly are these amusing creations? At their core, Halloween Graveyard Dirt Cups typically consist of layers of chocolate pudding, crushed cookies, and gummy worms. These ingredients combine to create the illusion of dirt and graves, making them fun to eat and visually captivating. Kids and adults alike can enjoy this playful take on dessert!
The fun doesn’t just stop at the taste; you can personalize them in endless ways. Consider adding edible decorations like mini tombstones or sprinkles shaped like ghosts to make these cups even more festive. This versatility invites you to let your imagination run wild, making each cup as unique as a carved pumpkin.
According to a recent survey published by Food Network, nearly 83% of Americans celebrate Halloween by creating or enjoying themed treats. That’s a significant number, showcasing how integral festive foods have become during this season. So why not join in the fun by making your own Halloween Graveyard Dirt Cups?
Not only do these dessert cups provide a fantastic opportunity to showcase your culinary skills, but they also offer a delightful way to connect with friends and family during the Halloween season. Imagine the laughter and cheers as everyone digs into their spooky treats, sharing stories as they enjoy your delightful creation.
In sum, Halloween Graveyard Dirt Cups offer a deliciously creepy twist on traditional desserts. They’re easy to prepare, customizable, and perfect for creating a festive atmosphere. So, let’s jump into the fun of making these delicious cups that are sure to become a Halloween favorite!
Ingredients for Halloween Graveyard Dirt Cups
Essential ingredients for a spooky delight
Creating your Halloween Graveyard Dirt Cups is not just fun; it’s also a rewarding culinary adventure. To make these delicious treats, you’ll need:
- Oreo cookies: The cornerstone of your dirt cups, crushed to create that classic “dirt” layer.
- Chocolate pudding mix: Rich and creamy, this acts as the base layer for your cups.
- Milk: Essential for preparing your pudding; buy whole milk for the creamiest result.
- Gummy worms: A must-have for that slimy, spooky touch!
- Plastic cups: Perfect for showcasing your layered dessert and making serving easy.
These ingredients work together to create a delightful blend, ensuring every bite brings a smile. For more ideas on spooky recipes, check out Taste of Home for some inspiration.
Optional ingredients for customizing your cups
Feel like getting creative? You can easily customize your Halloween Graveyard Dirt Cups with these fun extras:
- Whipped cream: For a fluffy top layer that gives a haunted house vibe.
- Chocolate sprinkles: Add some extra crunch and a festive touch.
- Candy tombstones: Use store-bought or homemade for personalized gravestones.
- Edible glitter: To give your cups that shimmer for a magical effect.
Mix and match these elements, and you’ll have a dessert that’s not only spooky but uniquely yours! Happy haunting!
Step-by-step Preparation of Halloween Graveyard Dirt Cups
Halloween is just around the corner, and what better way to celebrate this spooky season than by making Halloween Graveyard Dirt Cups? These delightful treats are not only visually striking but also incredibly easy to put together, making them perfect for your next Halloween party or gathering. Follow these steps, and you’ll be well on your way to impressing your friends and family with this creatively delicious dessert!
Gather your cooking tools and ingredients
Before you dive into the fun of assembling your Halloween Graveyard Dirt Cups, it’s essential to have everything at your fingertips. Here’s what you’ll need:
Ingredients
- 2 packs of instant chocolate pudding mix
- 4 cups of milk
- 1 package of chocolate sandwich cookies (like Oreos)
- Gummy worms or other creepy candy decor
- Optional: whipped cream for an extra creamy texture
- Small cups or mason jars for serving
Tools
- Mixing bowl
- Whisk
- Ziplock bag
- Rolling pin (or something to crush cookies)
- Spoon or spatula
Having everything organized makes the process smoother and boosts your fun! On a side note, if you’re looking for customization options, consider using different cookie flavors or adding special toppings like edible glitter.
Prepare the chocolate pudding mixture
Now that you have your ingredients ready, it’s time to whip up that delightful chocolate pudding. In a mixing bowl, combine the instant chocolate pudding mix and milk. You’ll need about 4 cups of milk for two packs of pudding mix.
- Whisk the mixture thoroughly until it’s smooth and well combined. You’ll know it’s ready when it thickens up a bit.
Let it sit for about 5 minutes while you prepare the next step. Quick tip: this is an excellent time to taste a spoonful or two to check for sweetness!
Crush the cookies for the “dirt”
Now, let’s get to the fun part: transforming those chocolate cookies into “dirt.”
- Place your chocolate sandwich cookies in a Ziplock bag, seal it tightly, and have some fun crushing them! Use your rolling pin or any heavy object to break the cookies into small crumbles. Aim for a texture that resembles soil; not too fine, or it won’t resemble dirt well.
This is also a great time to let loose! Crank up your favorite Halloween playlist while you crush those cookies.
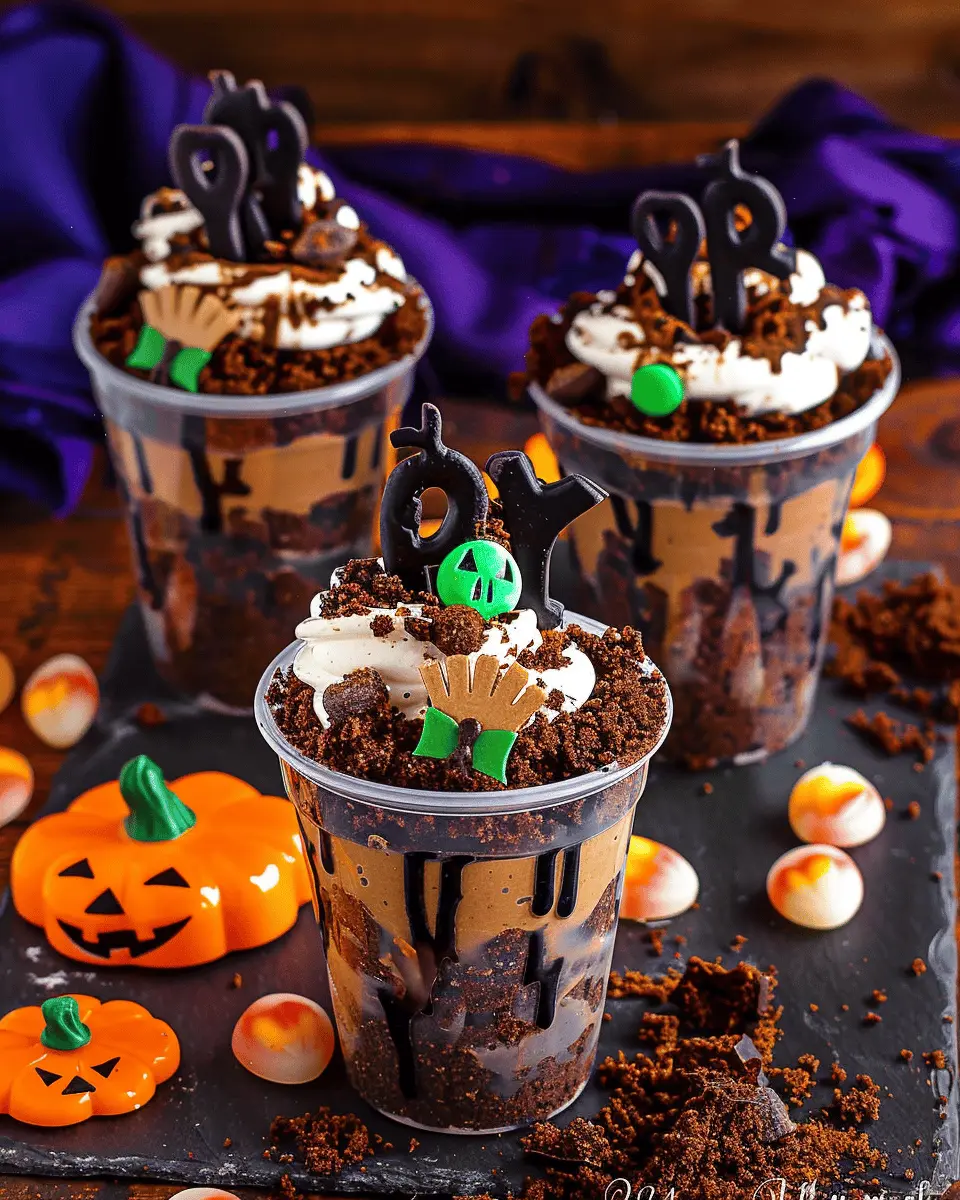
Assemble the layers in the cups
With your pudding ready and your crushed cookies prepared, it’s time to assemble your Halloween Graveyard Dirt Cups.
- Start by spooning a generous layer of chocolate pudding into the bottom of your cups.
- Next, add a layer of your crushed cookies on top to create the ‘dirt’ layer.
- For added flair, you can repeat these layers until you reach the top of your cups. Finish with a thick layer of crushed cookies for a truly graveyard vibe.
Make sure that your cups are clear so that your guests can see the beautiful layers you’ve created!
Decorate with gummy worms and spooky elements
Now comes the best part—decoration! This is where you can let your creativity shine. Add gummy worms to the top of your dirt cups, allowing them to dangle over the edges for a delightfully creepy look.
- For extra decoration, consider using Halloween-themed toppings such as edible eyeballs or plastic gravestones, which you can find at most candy stores or craft shops during this season. You can also use whipped cream to create ghostly shapes on top.
The aesthetic appeal of these cups is as significant as their delicious taste, so don’t hesitate to get artistic!
With these steps, you’ll have a marvelous batch of Halloween Graveyard Dirt Cups ready to impress your friends. Remember, part of the fun is in the gathering, so enjoy bonding over the preparation process. Happy Halloween!
Variations on Halloween Graveyard Dirt Cups
Halloween is the perfect time to get creative in the kitchen, and Halloween Graveyard Dirt Cups are no exception! Whether you have dietary restrictions or simply want to try something new, there are plenty of variations to explore.
Gluten-Free Dirt Cups
For those following a gluten-free diet, you can easily make your Halloween Graveyard Dirt Cups a spooky treat! Just swap out regular chocolate cookies for gluten-free oreos. There are many delicious brands available that mimic the taste and texture of traditional cookies. Additionally, ensure that your pudding mix is gluten-free as well—many brands are, but it’s always good to double-check.
Professional chefs recommend brands like Jello for both chocolate and vanilla pudding that are readily available and gluten-free. You can also use gluten-free graham crackers crushed into “dirt” to maintain the gritty texture. Mixing in some chocolate chips will add an extra crunch that kids (and adults) will love.
Vegan-Friendly Options
If you’re looking for vegan Halloween Graveyard Dirt Cups, it’s easier than you might think! Substitute regular pudding with plant-based alternatives like silken tofu blended with cocoa powder and maple syrup. This creates a creamy, delicious base that’s entirely dairy-free.
To replace the cookies, consider using crushed vegan cookies or make your own with whole grains and coconut oil. You can even mix in some chia seeds for added texture and nutrition. Not only will these dirt cups taste fantastic, but they’ll also impress your friends with their delicious and thoughtful ingredients.
By customizing your Halloween Graveyard Dirt Cups, you can appreciate all the festive flavors while accommodating everyone’s diet. Who knew spooky treats could bring everyone together so delightfully? If you want to dive deeper into creative dessert ideas, check out PBS Food for more inspiration!
Cooking Tips and Notes for Halloween Graveyard Dirt Cups
Tips for achieving the perfect pudding texture
Getting the right pudding texture for your Halloween Graveyard Dirt Cups is essential for that creamy delight we all love. To achieve the ideal consistency:
- Whisk Enthusiastically: When mixing your pudding, whisk it vigorously. This helps dissolve all lumps and creates a smooth texture.
- Chill Time: Allow the pudding to sit in the refrigerator for at least 30 minutes before assembly. This helps thicken it up and develop rich flavors.
- Flavor Balance: Consider adding a splash of vanilla extract for an extra depth of flavor. Simple tweaks can elevate your dessert experience—trust me!
Notes on cookie choice and texture
Choosing the right cookies for your Halloween Graveyard Dirt Cups can enhance both flavor and visual appeal:
- Chocolate Oreos vs. Vanilla Wafers: Traditional Oreos provide that classic “dirt” look, but if you want a fun twist, try crushed vanilla wafers. Experimenting with different textures creates a unique experience for your guests.
- Freshness Matters: Use cookies that are fresh for optimal crunch. Stale cookies might not provide that delightful crunch you want when layered with pudding.
By following these tips, your Halloween Graveyard Dirt Cups will surely impress your friends at any spooky gathering! Enjoy creating these treats that combine creativity and flavor. For more unique dessert ideas, check out sites like Food Network or BBC Good Food.
Serving Suggestions for Halloween Graveyard Dirt Cups
When it comes to serving your Halloween Graveyard Dirt Cups, presentation is key to making them a spooky yet delightful addition to your Halloween festivities.
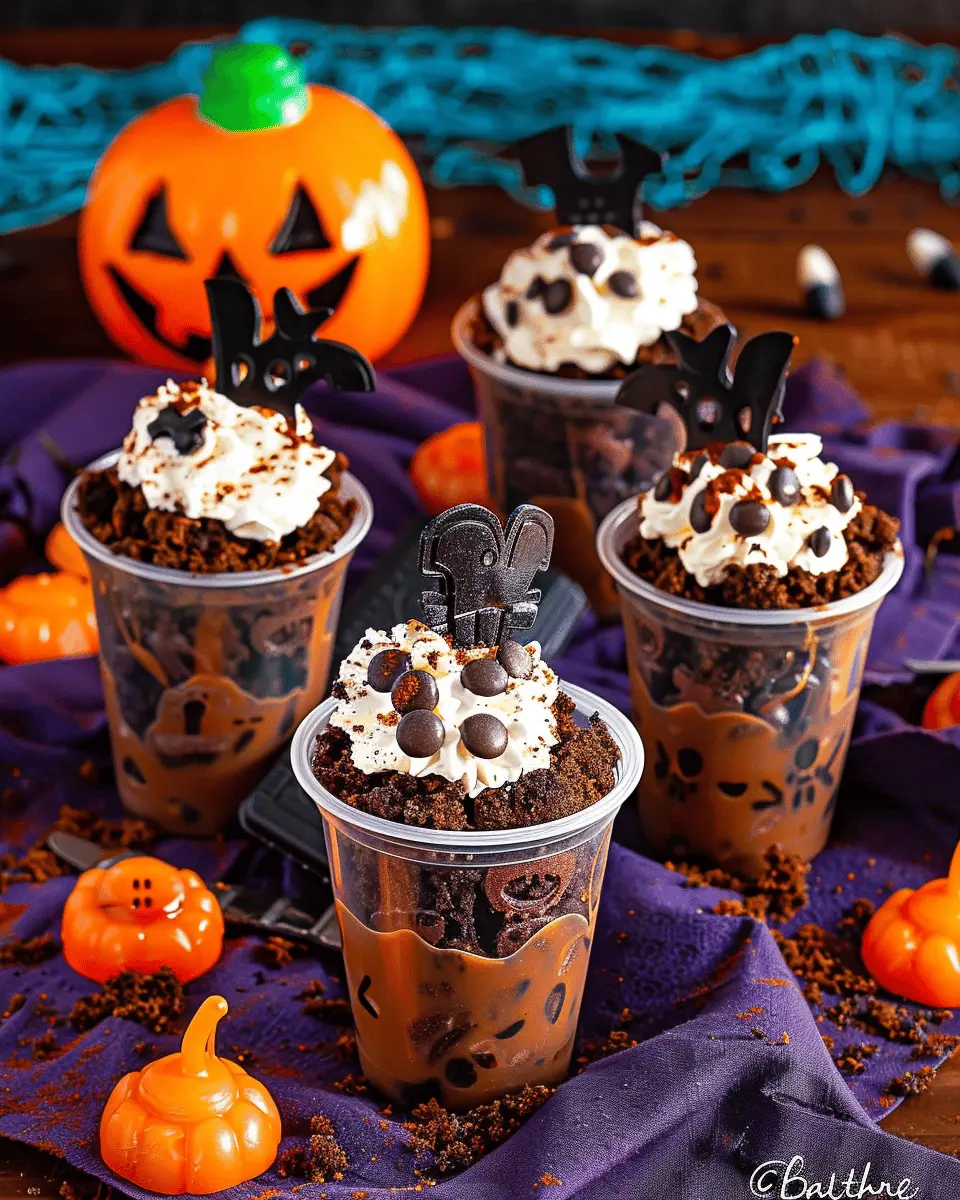
Creative Ways to Present Your Dirt Cups at Parties
- Use Clear Cups: Opt for clear plastic cups or mason jars. This allows the layers of “dirt” (chocolate pudding and crushed cookies) to shine through, creating an enticing visual.
- Decorate the Rim: Dip the edges of your cups in melted chocolate and then in crushed cookies for an extra touch. This adds to the “dirt” theme and offers a crunchy bite.
- Top With Creepy Decorations: Use gummy worms, candy eyeballs, or even mini tombstones (made from chocolate or candy) to elevate the look.
Pairing Suggestions for Beverage Options
To complement your Halloween Graveyard Dirt Cups, consider serving some fun non-alcoholic drinks, such as:
- Spooky Punch: A bright green or deep purple punch can be both refreshing and on theme. You could use soda mixed with fruit juice for a bubbly effect.
- Cloudy Lemonade: Add a dash of activated charcoal to lemonade for a ghostly appearance.
These drink pairings not only enhance the overall spooky atmosphere but also provide a delightful contrast to the sweetness of the dirt cups. Why not try a Halloween punch recipe to match?
For more festive ideas, check out Good Housekeeping’s Halloween Drink Recipes for fun non-alcoholic options.
Time Breakdown for Halloween Graveyard Dirt Cups
When planning your spooky gathering, it’s essential to know just how much time you’ll need for these delightfully creepy Halloween Graveyard Dirt Cups. Here’s a quick breakdown to help you manage your cooking timeline effectively.
Preparation Time
You’ll want to set aside about 20 minutes for the preparation. This includes gathering your ingredients, mixing the pudding, and layering it in your cups. It’s the perfect task to do while chatting with friends or catching up on a podcast.
Chill Time
After prepping, the cups need a good 2 hours in the refrigerator to set. This step is crucial, as it allows the flavors to meld together beautifully. While you wait, why not prepare some themed snacks or drinks?
Total Time
In total, you’re looking at around 2 hours and 20 minutes from start to serving. By including these cups as part of your Halloween spread, you’re sure to impress your guests with minimal effort.
For more spooky delights, check out this guide on Halloween snacks from Food Network. Happy Halloween planning!
Nutritional Facts for Halloween Graveyard Dirt Cups
Calories per serving
Each serving of these delightful Halloween Graveyard Dirt Cups packs around 200 calories. This makes it a fun, guilt-free treat for your Halloween festivities. Not too heavy, but just enough sweetness to satisfy those cravings!
Sugar content
If you’re watching your sugar intake, keep in mind that these cups contain approximately 15 grams of sugar per serving. While they’re definitely a treat, moderation is key. Consider swapping out regular chocolate with healthier alternatives, like dark chocolate, to cut down on sugar without sacrificing taste.
Possible allergens to consider
When preparing Halloween Graveyard Dirt Cups, it’s essential to keep a few allergens in mind. Common ingredients like chocolate pudding and Oreo cookies may contain gluten or dairy. Always check labels and opt for gluten-free or dairy-free alternatives if necessary. If you’re hosting friends, consider asking about food allergies in advance to ensure everyone can indulge safely.
For more insights on managing allergies in festive treats, check out resources from Kids With Food Allergy or The Food Allergy Research & Education. Wouldn’t want anyone left out of the spooky fun!
FAQs about Halloween Graveyard Dirt Cups
Can I make these cups ahead of time?
Absolutely! Halloween Graveyard Dirt Cups are perfect for prepping in advance. You can assemble the pudding mixtures and crush the cookies a day before your spooky gathering. Just store everything in airtight containers in the fridge. On the day of your event, layer your cups with the cookie “dirt” and fun toppings. This way, you’ll save time and have a stress-free Halloween celebration!
What other toppings can I use?
While Halloween Graveyard Dirt Cups typically feature gummy worms and spooky decorations, there’s a world of creative toppings waiting for you! Consider these suggestions to spice up your cups:
- Candy Crumbles: Crushed candy bars or sprinkles for added sweetness.
- Chocolate Chips: Mini chocolate chips resemble small pebbles.
- Mallow Ghosts: Use mini marshmallows and draw on ghost faces.
- Licorice Twists: Cut into smaller pieces to mimic graves or tombstones.
Feel free to get creative! The goal is to have fun and make it visually interesting for your guests, encouraging them to dig into the fun.
How do I store leftovers?
If you find yourself with leftover Halloween Graveyard Dirt Cups, don’t fret! Simply cover the cups with plastic wrap or transfer the contents to a sealed container. Ideally, enjoy them within 2-3 days for the best taste and freshness. If you notice the cookies getting too soggy, consider keeping the cookie layer separate until you’re ready to enjoy them again.
For more Halloween-themed treats, check out resources like Taste of Home or Food Network for additional recipes and inspiration. Happy Haunting!
Conclusion on Halloween Graveyard Dirt Cups
Creating Halloween Graveyard Dirt Cups is a delightful blend of fun and creativity, making them a hit at any spooky gathering. The beauty of these treats lies not only in their whimsical appearance but also in the joyful process of assembling them. Whether you’re layering chocolate pudding, crushed cookies, and gummy worms, or adding your own twist with colorful toppings, the possibilities are endless.
Don’t forget to share your creations on social media — it’ll inspire others to join in the Halloween fun! For more festive ideas, check out resources like Good Housekeeping or Taste of Home. So, roll up your sleeves, unleash your inner artist, and enjoy crafting these fantastic desserts!
PrintHalloween Graveyard Dirt Cups: Easy Indulgence for Spooky Fun
Create delectable Halloween graveyard dirt cups that are fun and easy to make for a spooky celebration!
- Prep Time: 15 minutes
- Total Time: 45 minutes
- Yield: 4 servings 1x
- Category: Dessert
- Method: No Bake
- Cuisine: American
Ingredients
- 1 package chocolate pudding mix
- 2 cups milk
- 1 package Oreo cookies, crushed
- 1 cup whipped topping
- Gummy worms for decoration
- Chocolate sprinkles for a spooky effect
Instructions
- In a mixing bowl, whisk together the chocolate pudding mix and milk until smooth.
- Fold in the whipped topping until well combined.
- In clear cups, layer the pudding mixture and crushed Oreos alternately.
- Top with gummy worms and chocolate sprinkles.
- Chill in the refrigerator for at least 30 minutes before serving.
Notes
- For a richer taste, use whole milk in the pudding mix.
- You can add more layers with additional ingredients like chocolate chips.
Nutrition
- Serving Size: 1 cup
- Calories: 250
- Sugar: 15g
- Sodium: 150mg
- Fat: 12g
- Saturated Fat: 7g
- Unsaturated Fat: 4g
- Trans Fat: 0g
- Carbohydrates: 32g
- Fiber: 1g
- Protein: 3g
- Cholesterol: 15mg
Keywords: Halloween, Dirt Cups, Desserts, Spooky Treats