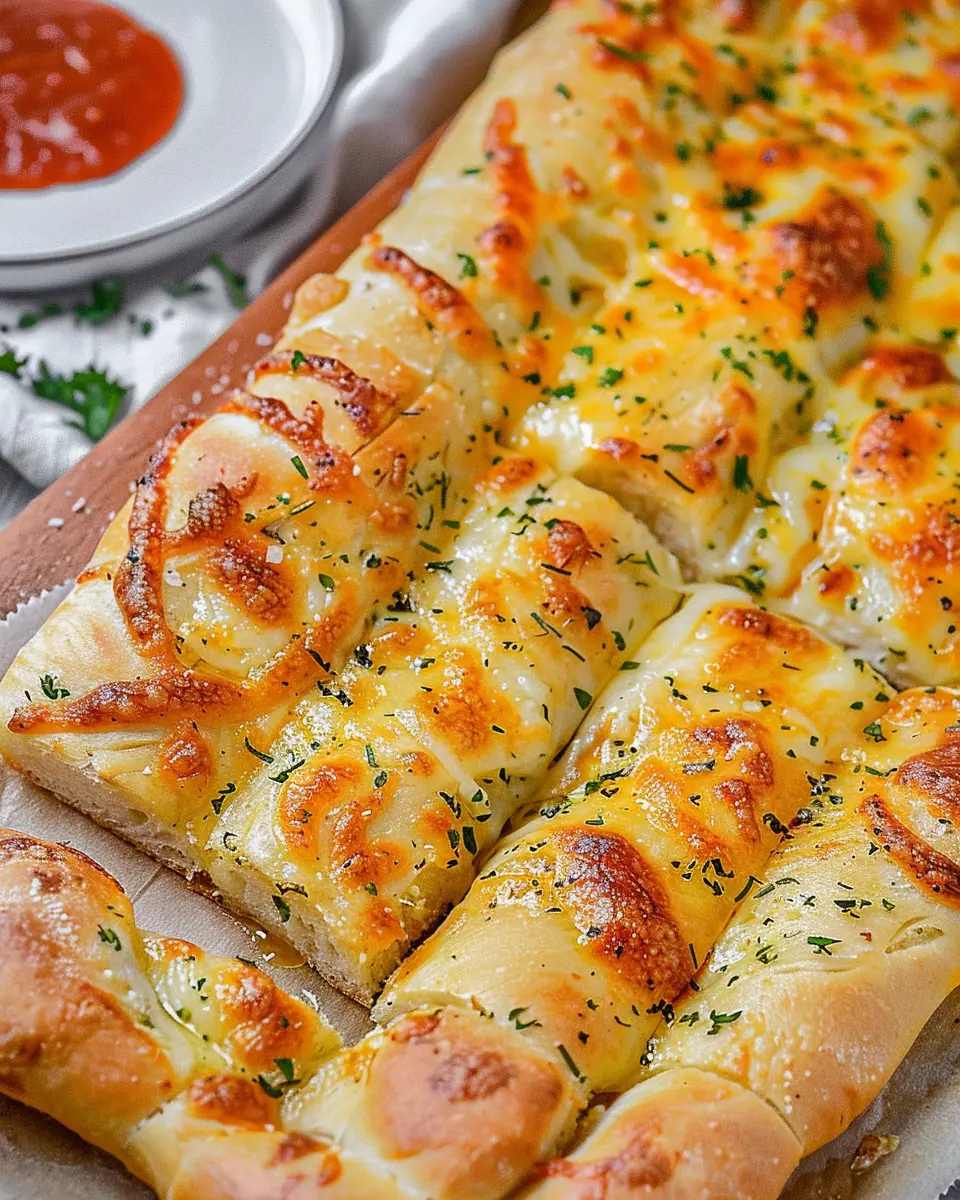
Introduction to Homemade Cheesy Garlic Breadsticks
There’s something irresistible about the aroma that wafts through your kitchen when you bake a batch of homemade cheesy garlic breadsticks. The combination of warm, buttery bread, aromatic garlic, and gooey melted cheese is pure comfort food, perfect for any occasion. Whether you’re hosting a game night, having a cozy dinner with friends, or just indulging in a quiet evening at home, these delightful sticks can take your meal to the next level.
What’s the allure of homemade cheesy garlic breadsticks?
Let’s face it—store-bought options don’t hold a candle to the satisfaction of a freshly made batch straight from your oven. Here’s why these homemade cheesy garlic breadsticks have captured the hearts—and stomachs—of many:
-
Fresh Ingredients: When you make your own, you control the ingredients. Choose the best quality bread, fresh garlic, and your favorite cheese for the perfect flavor profile. Feel free to experiment with herbs or even add a sprinkle of chili flakes for a kick!
-
Customizable Recipes: Want to add some Turkey Bacon or Chicken Ham? Go for it! You can tailor the recipe to suit your taste buds, ensuring each stick is a reflection of what you love.
-
Satisfying Craft: There’s a certain joy in the cooking process itself. Kneading the dough and watching it rise can be wonderfully therapeutic. Plus, the smiles from your friends and family as they dig in? Priceless.
-
Perfect Pairing: These cheesy delights pair effortlessly with a variety of dishes—think pasta, salads, or even a warm bowl of soup. They can be the star of your meal or a delicious sidekick.
Creating your own homemade cheesy garlic breadsticks means that every bite is infused with love and care. So, gather your ingredients, roll up your sleeves, and get ready for a cozy culinary adventure!
And if you’re looking for tips on making killer breadsticks, check out excellent resources on sites like Serious Eats or Bon Appétit for expert insights. The world of bread-making awaits you, and trust me, it’s a delicious one!

Ingredients for Homemade Cheesy Garlic Breadsticks
When craving those warm, homemade cheesy garlic breadsticks, having the right ingredients on hand is key to achieving that gooey, delightful taste we all love. Here’s a breakdown of what you’ll need.
Essential ingredients you’ll need
- Pizza Dough: You can use store-bought or make your own from scratch. If you opt for homemade, a simple recipe can be found here.
- Garlic: Fresh minced garlic adds a wonderful kick.
- Butter: Melted butter enhances flavor and helps with browning.
- Mozzarella Cheese: The ultimate cheesy base—use shredded for that perfect melt.
- Parmesan Cheese: A sprinkle on top adds a lovely nutty flavor.
Optional ingredients to elevate your breadsticks
- Italian Herbs: Dried oregano or basil can infuse extra flavor.
- Red Pepper Flakes: For those who like a little heat.
- Turkey Bacon or Chicken Ham: Add crispy bits for a savory twist—who can resist that?
Now that you know what to gather, you’re all set to indulge in these irresistible breadsticks! Don’t forget to pair them with your favorite dipping sauce for that extra touch of deliciousness.
Step-by-step preparation for Homemade Cheesy Garlic Breadsticks
If you’re in the mood for a delicious and gooey snack, these homemade cheesy garlic breadsticks will make your taste buds dance with delight. Let’s dive into the preparation process, ensuring you have everything you need for a perfect finish.
Gather and prep your ingredients
Before you start baking, make sure you’ve got everything ready. Here’s what you’ll need:
- 1 cup warm water
- 2 ¼ teaspoons active dry yeast
- 2 tablespoons sugar
- 3 cups all-purpose flour
- 1 teaspoon salt
- 4 tablespoons unsalted butter (melted)
- 4 garlic cloves (minced or finely chopped)
- 1 teaspoon garlic powder
- 1½ cups shredded mozzarella cheese
- ½ cup grated parmesan cheese
- Optional toppings: Italian herbs, crushed red pepper flakes
Once you’ve gathered these ingredients, measure everything out in advance. This makes the entire process smoother and ensures you won’t miss any crucial components. You can even preload the toppings with fresh herbs to amp up your breadsticks exponentially!
Preheat the oven to perfection
Next, it’s time to turn on your trusty oven. Preheating it to 400°F (200°C) is essential for getting that golden, crispy exterior on your breadsticks. While the oven heats up, you can move on to the next steps without losing any precious time.
Prepare the pizza crust
To craft your delicious homemade cheesy garlic breadsticks, we need to create the dough. In a mixing bowl, combine warm water, yeast, and sugar. Let it sit for about 5-10 minutes until it’s frothy—a little sign that your yeast is activating! Then, mix in the flour, salt, and half of your melted butter.
Knead the dough on a floured surface for about 5 minutes until it’s smooth and elastic. If you’re short on time, a stand mixer with a dough hook can speed things up! If you’re looking for some great mixers, check out those from trusted brands like KitchenAid or Cuisinart.
Whip up the garlic butter mixture
While the dough is rising, let’s work on that irresistible garlic butter. In a small saucepan, melt the remaining butter over low heat and add the minced garlic and garlic powder. Stir it well and let it simmer just until fragrant—this will add a robust flavor to your breadsticks that’s hard to beat.
Assemble the cheesy toppings
Once your dough has risen (about 30 minutes), it’s time to roll it out! Gently punch down your dough and spread it on a greased baking sheet. Use your hands to shape it into a rectangle that fits the pan. Brush your garlic butter mixture generously over the surface and sprinkle both types of cheese evenly on top.
Feeling adventurous? This is the perfect time to add some crushed red pepper flakes or Italian herbs to give your homemade cheesy garlic breadsticks that extra zing.
Slice the dough into perfect sticks
With your toppings in place, it’s time to slice your dough into breadstick shapes. Using a sharp knife or pizza cutter, cut them into your desired width—typically around 1 inch works great. Make sure they’re evenly spaced so they can cook consistently, which means no burnt edges!
Bake and freshen up your kitchen
Now it’s time to place your baking sheet in the oven! Bake those bad boys for about 15-20 minutes or until they are golden brown and the cheese is bubbling. You’ll know they’re ready when your kitchen starts smelling utterly irresistible!
Once they have baked to perfection, take them out and let them cool for a few minutes before serving. Optionally, brush on a little more of that garlic butter mixture for a final touch.
There you have it—your very own batch of homemade cheesy garlic breadsticks that will be the star of any meal or snack time. Enjoy them right out of the oven or serve them up with marinara sauce for extra flavor!
Variations on Homemade Cheesy Garlic Breadsticks
When it comes to homemade cheesy garlic breadsticks, the variations are endless! Whether you crave something herbs and spices, a kick of heat, or a veggie-packed delight, there’s a version for everyone.
Cheesy Herb-Infused Breadsticks
If you’re a fan of bright flavors, try infusing your cheesy garlic breadsticks with fresh herbs. A blend of parsley, basil, and oregano not only enhances the flavor but also adds a pop of color. Simply mix dried or fresh herbs into your cheese blend before baking for an aromatic experience that’ll transport you to your favorite Italian bistro.
- Tip: Pair these with a homemade marinara sauce for dipping, and if you like, you can find some great recipes on Serious Eats.
Spicy Garlic Breadsticks with a Kick
For those who crave excitement, consider adding red pepper flakes or a dash of cayenne to your homemade cheesy garlic breadsticks. The warmth balances beautifully with the creamy cheese. You can also try adding a hint of jalapeño for an extra punch. Serve these breadsticks with a refreshing cilantro-lime dip to cool off the heat!
Veggie-Loaded Cheesy Breadsticks
Want to sneak in some healthy goodness? Load your cheesy breadsticks with finely diced veggies like bell peppers, spinach, or even sun-dried tomatoes. This not only expands the flavor profile but also boosts the nutritional value. Plus, it’s a fantastic way to get those daily veggies in a tasty package.
- Consider this: The American Heart Association recommends increasing vegetable intake for overall health.
With these variations, your homemade cheesy garlic breadsticks will never be boring! Choose your favorite (or try them all!) and watch them disappear from the table faster than you can say “Delicious!”
Cooking Tips and Notes for Homemade Cheesy Garlic Breadsticks
Common Pitfalls and How to Avoid Them
When whipping up homemade cheesy garlic breadsticks, many run into a few common hiccups. Here’s how to steer clear:
- Dough Stickiness: If your dough feels too sticky, sprinkle a little flour on your working surface. This will make kneading easier without overworking the dough.
- Too Chewy: Over-kneading can make your breadsticks tough. Aim for about 5-7 minutes of kneading to develop just the right texture.
Secrets to Perfect Cheese Melting
For cheese that melts to heavenly perfection on your homemade cheesy garlic breadsticks, consider these tips:
- Choose the Right Cheese: Mozzarella is fantastic for its stretchiness, but mixing it with a bit of provolone or cheddar can up your flavor game!
- Grate Your Cheese: Freshly grated cheese melts better than pre-shredded varieties because it lacks anti-caking agents. Plus, it integrates beautifully with the garlic butter topping.
Crafting those savory breadsticks at home doesn’t have to be intimidating. With these insights, you’re all set for delicious results! For even more tips, check out Serious Eats for expert advice. Happy cooking!
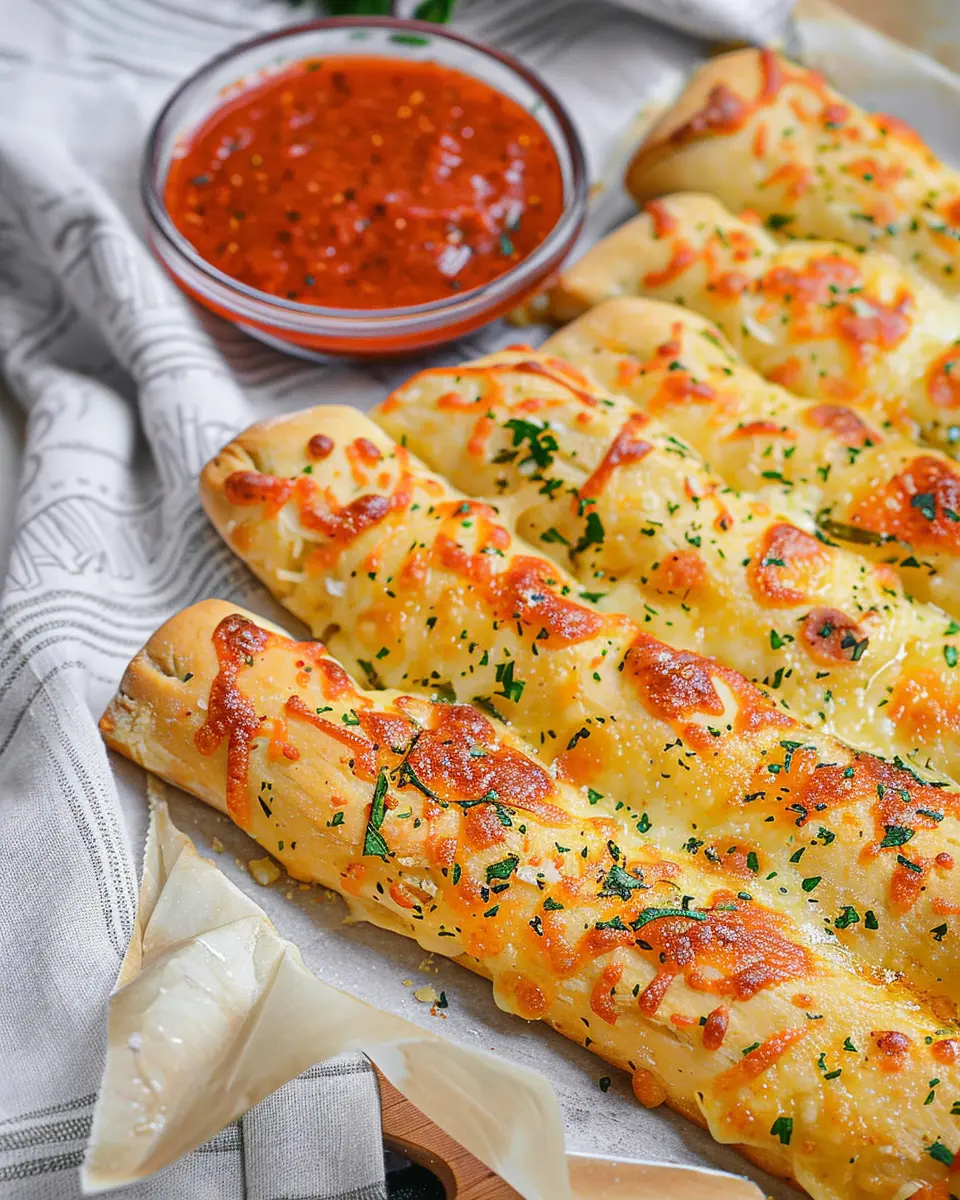
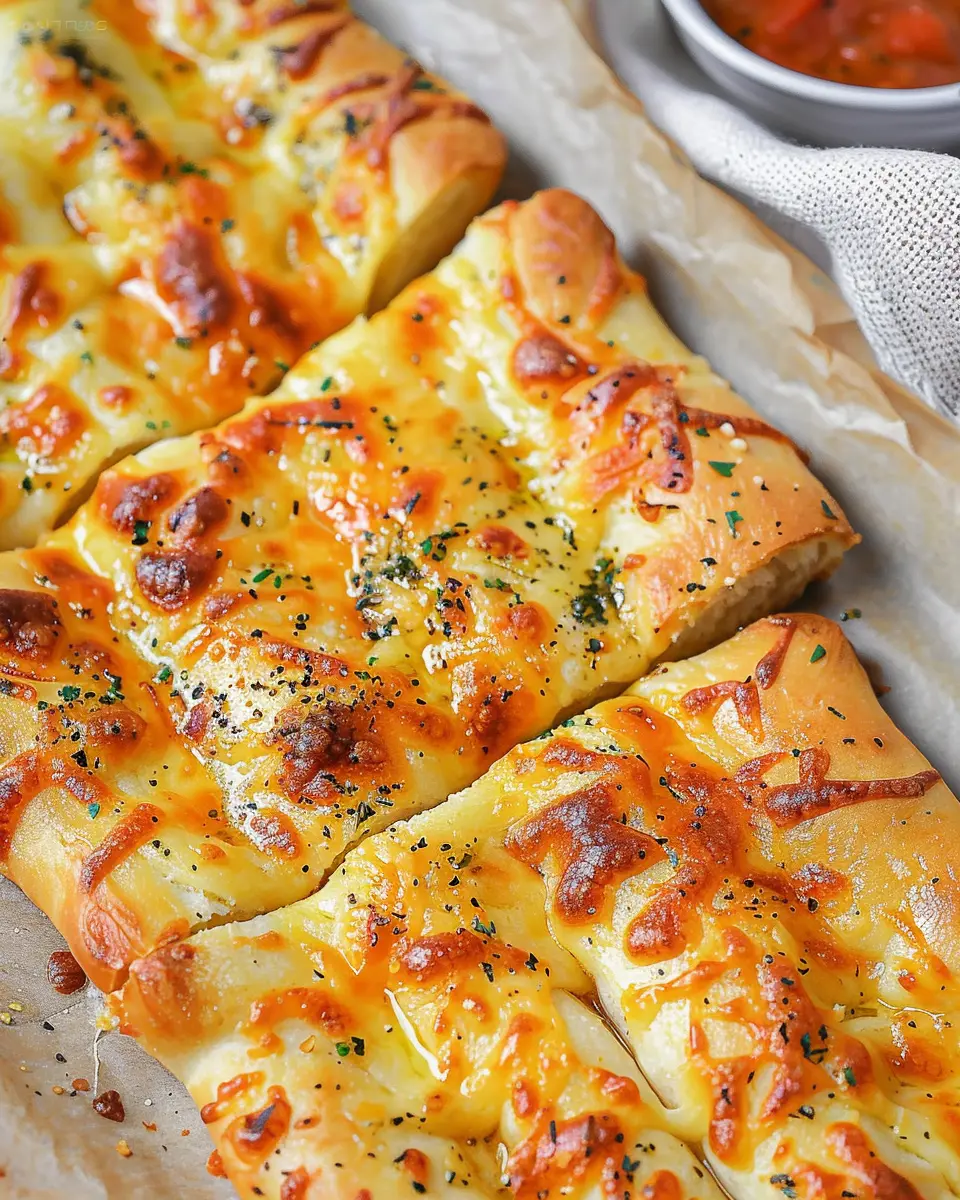
Serving suggestions for Homemade Cheesy Garlic Breadsticks
Pairing with sauces and dips
When enjoying your homemade cheesy garlic breadsticks, the right sauce can elevate the experience. Consider serving them with:
- Marinara Sauce: A classic choice that complements the garlic and cheese beautifully. A splash of herbs adds an extra layer of flavor.
- Ranch Dressing: This creamy alternative offers a tangy bite that contrasts nicely with the warm, cheesy bread.
- Alfredo Sauce: For those who love decadence, a drizzle of rich, creamy Alfredo is perfection.
Experimenting with different dips can keep things exciting, and don’t hesitate to mix up your sauces!
Creating a lovely presentation
Presentation matters, especially when you’re serving homemade cheesy garlic breadsticks to friends. Here are a few quick tips:
- Use a wooden cutting board: Not only does it look rustic, but it also makes slicing easy.
- Garnish with fresh herbs: A sprinkle of chopped parsley or basil adds a pop of color and freshness.
- Arrange artistically: Lay out the breadsticks in a fanned pattern, or stack them vertically for a trendy touch.
By presenting your meal thoughtfully, you create an inviting atmosphere—perfect for impressing dinner guests or enjoying a cozy night in. For more serving styles and ideas, check out this helpful guide on pairing sauces.
Let your creativity flow, and don’t forget to enjoy every bite!
Time Breakdown for Homemade Cheesy Garlic Breadsticks
Preparation Time
Getting started on your homemade cheesy garlic breadsticks is a breeze! You’ll need about 10 minutes to gather all your ingredients and prepare the dough. Pro tip: if you’ve measured out your flour and garlic in advance, you’ll save even more time.
Baking Time
Once your dough is ready and shaped, bake those beauties for 15-20 minutes. You’ll want to keep an eye on them to avoid over-browning; golden edges mean they’re perfection!
Total Time
So, in just 25-30 minutes, you can have delicious, gooey homemade garlic breadsticks ready to enjoy. Perfect for movie nights or a snack while you work! For some extra tips on timing and methods, check out this great article on baking tips.
Nutritional facts for Homemade Cheesy Garlic Breadsticks
Calories per breadstick
Each serving of your homemade cheesy garlic breadsticks packs around 150-200 calories, depending on the ingredients and serving size. It’s a delightful addition to any meal, but be mindful of how many you indulge in!
Key nutritional components
When it comes to nutrient content, these breadsticks offer a blend of flavor and nutrition:
- Carbohydrates: Essential for energy, most of the calories come from carbs, making these perfect for a post-workout snack.
- Protein: The gooey cheese boosts protein content, which is great for muscle recovery.
- Fat: While they contain fats from cheese and butter, using lighter spreads can help keep the recipe healthier.
- Vitamins: If you sprinkle garlic generously, you’re adding beneficial compounds that may enhance your immunity.
For more insights on balanced eating, check resources like the Harvard T.H. Chan School of Public Health.
FAQs about Homemade Cheesy Garlic Breadsticks
Can I use gluten-free pizza crust?
Absolutely! If you’re looking to make homemade cheesy garlic breadsticks and need a gluten-free option, many great alternatives are available. Gluten-free pizza crusts made from almond flour, cauliflower, or chickpea flour can work wonderfully. Just follow the cooking instructions on the package for best results. You’ll still enjoy that cheesy, garlicky goodness without the gluten!
How do I store leftover breadsticks?
If you find yourself with extra homemade cheesy garlic breadsticks, storing them is simple! Allow the breadsticks to cool completely, then wrap them tightly in aluminum foil or place them in an airtight container. They can be stored in the refrigerator for up to three days. For longer storage, consider freezing them—just ensure they’re well-wrapped. When you’re ready to enjoy them again, simply reheat in the oven for that fresh-baked taste.
What dips go well with cheesy garlic breadsticks?
Pairing your homemade cheesy garlic breadsticks with dips can elevate your snack game! Here are some delicious options to consider:
- Marinara sauce: A classic choice that complements the garlic and cheese flavors.
- Ranch dressing: Creamy and herby, it adds a delightful twist.
- Alfredo sauce: For those who love a rich and buttery dip, this is a perfect match.
- Pesto: The freshness of basil pairs beautifully with the savory breadsticks.
Whether enjoying them as a quick snack or serving them at a gathering, these breadsticks will be a crowd-pleaser! For more ideas on dips, consider checking out this resource for a variety of flavorful options.
Conclusion on Homemade Cheesy Garlic Breadsticks
Why you’ll love making these at home!
Making homemade cheesy garlic breadsticks is not just about enjoying a delicious snack; it’s about the experience. The aroma of garlic and melted cheese wafting through your kitchen can turn any ordinary evening into a culinary delight.
- Customization: You get to decide on toppings—add Turkey Bacon or Chicken Ham for a unique twist!
- Freshness: Homemade means no preservatives, just fresh ingredients delivering maximum flavor.
- Fun Activity: Whether alone or with friends, this is a recipe meant for sharing. Why not whip them up for a cozy movie night or a game day?
Trust me, these cheesy delights will become a staple in your culinary repertoire!
Printhomemade cheesy garlic breadsticks that are irresistibly delicious
Delicious homemade cheesy garlic breadsticks that are perfect as a side or snack.
- Prep Time: 15 minutes
- Cook Time: 20 minutes
- Total Time: 35 minutes
- Yield: 12 breadsticks 1x
- Category: Appetizers
- Method: Baking
- Cuisine: Italian
- Diet: Vegetarian
Ingredients
- 2 cups all-purpose flour
- 1 tablespoon garlic powder
- 1 teaspoon salt
- 1 tablespoon sugar
- 1 packet active dry yeast
- 3/4 cup warm water
- 1 tablespoon olive oil
- 1 cup shredded mozzarella cheese
- 1/2 cup grated Parmesan cheese
- 2 tablespoons fresh parsley, chopped
Instructions
- In a bowl, mix warm water and active dry yeast. Let it sit for 5 minutes.
- Add olive oil, sugar, garlic powder, salt, and flour. Mix until well combined and knead for about 5 minutes.
- Place the dough in a greased bowl and cover with a cloth. Let it rise for 1 hour.
- Preheat the oven to 375°F (190°C).
- Roll the dough into sticks and place them on a baking sheet.
- Sprinkle mozzarella and Parmesan cheese on top.
- Bake for 15-20 minutes until golden brown.
- Sprinkle with fresh parsley before serving.
Notes
- For extra flavor, brush the dough with melted butter before baking.
- Let the breadsticks cool slightly for easier handling.
Nutrition
- Serving Size: 2 breadsticks
- Calories: 220
- Sugar: 1g
- Sodium: 300mg
- Fat: 9g
- Saturated Fat: 3g
- Unsaturated Fat: 4g
- Trans Fat: 0g
- Carbohydrates: 28g
- Fiber: 1g
- Protein: 8g
- Cholesterol: 10mg
Keywords: Homemade Cheesy Garlic Breadsticks