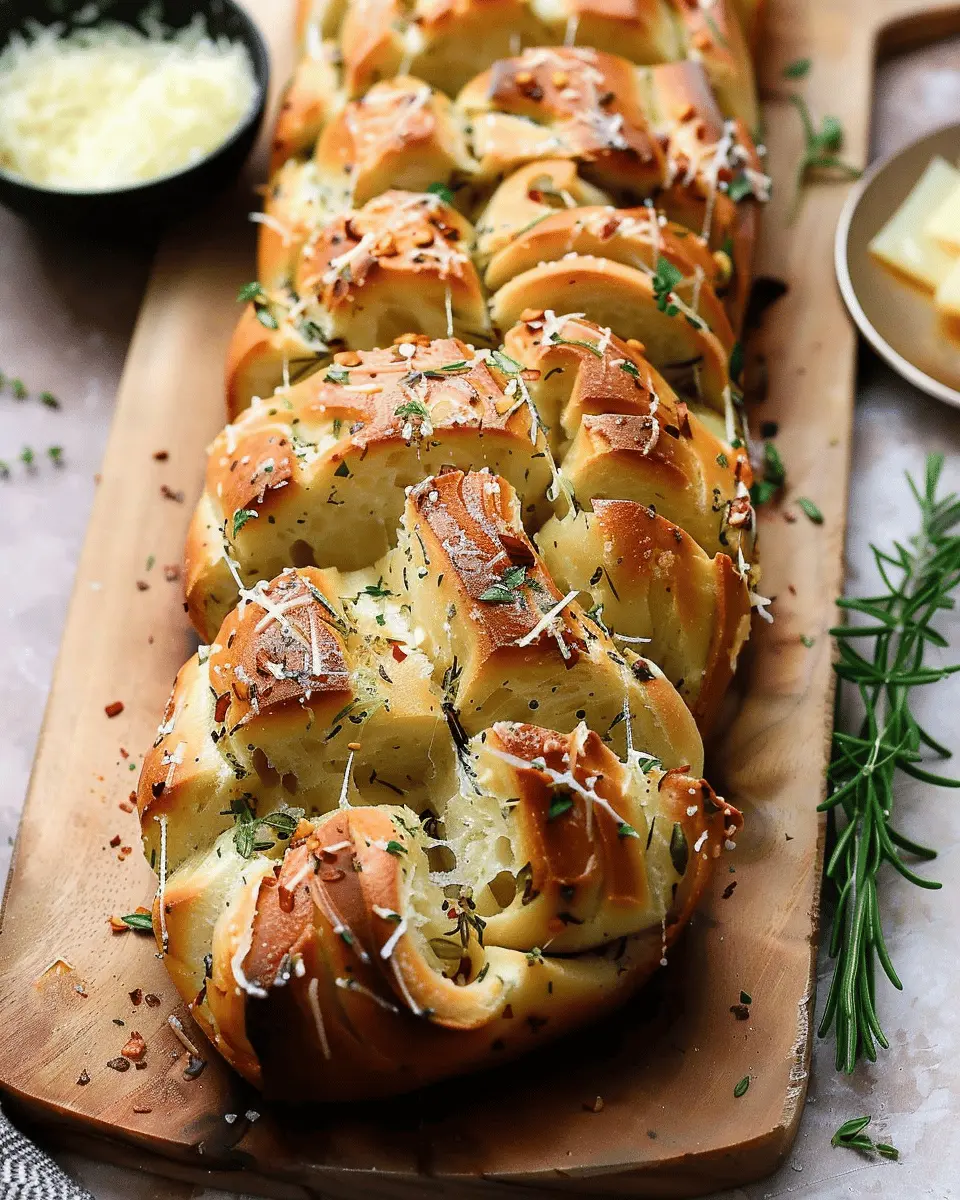
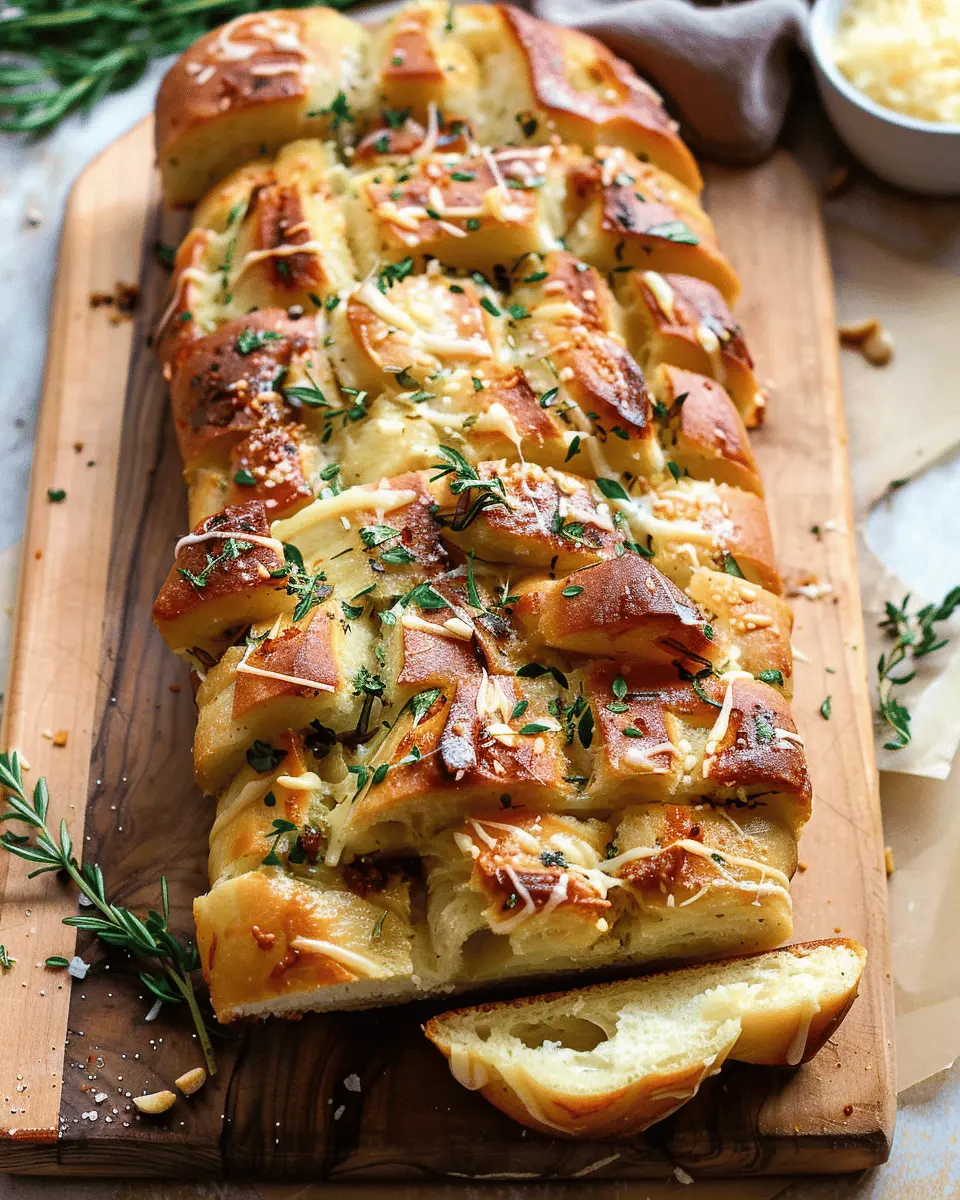
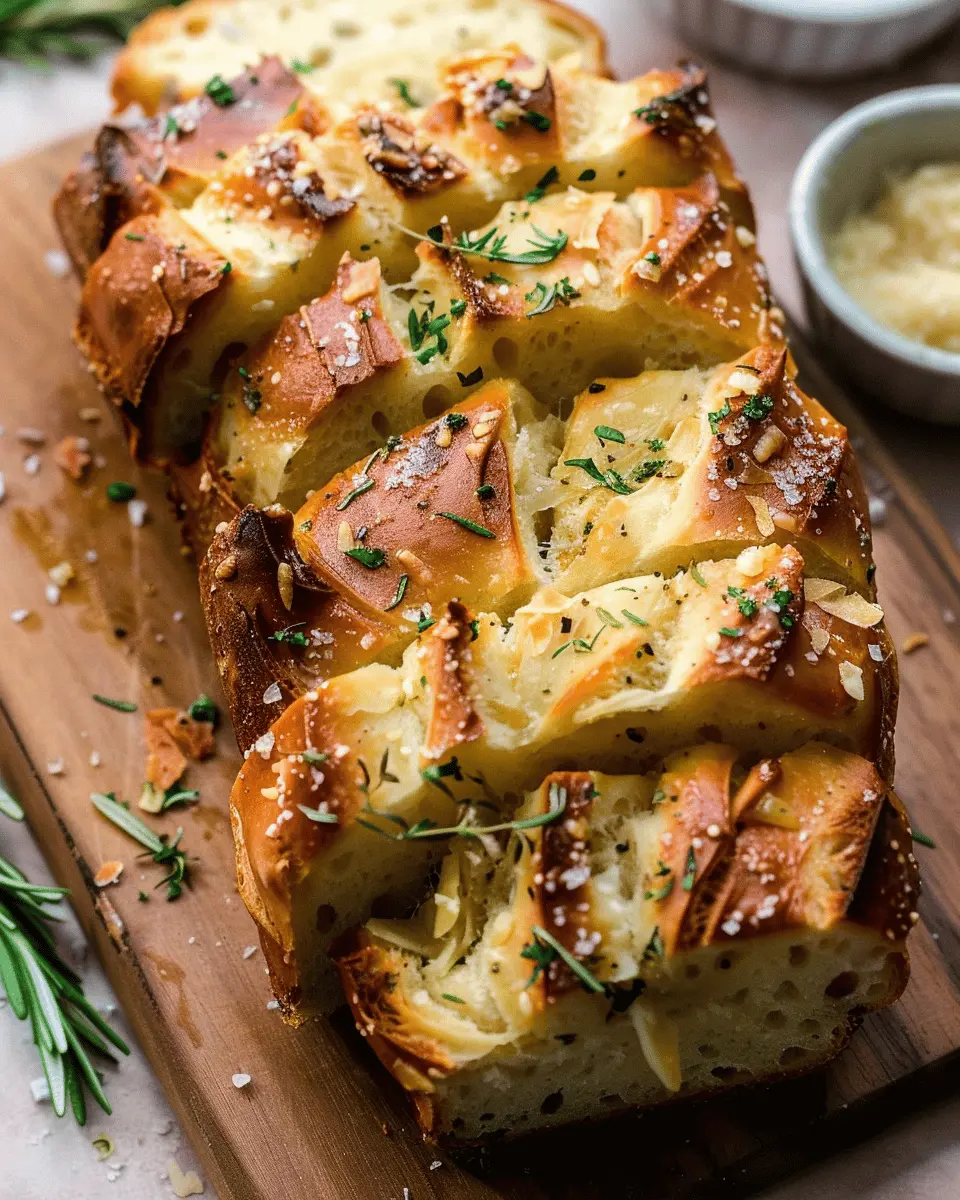
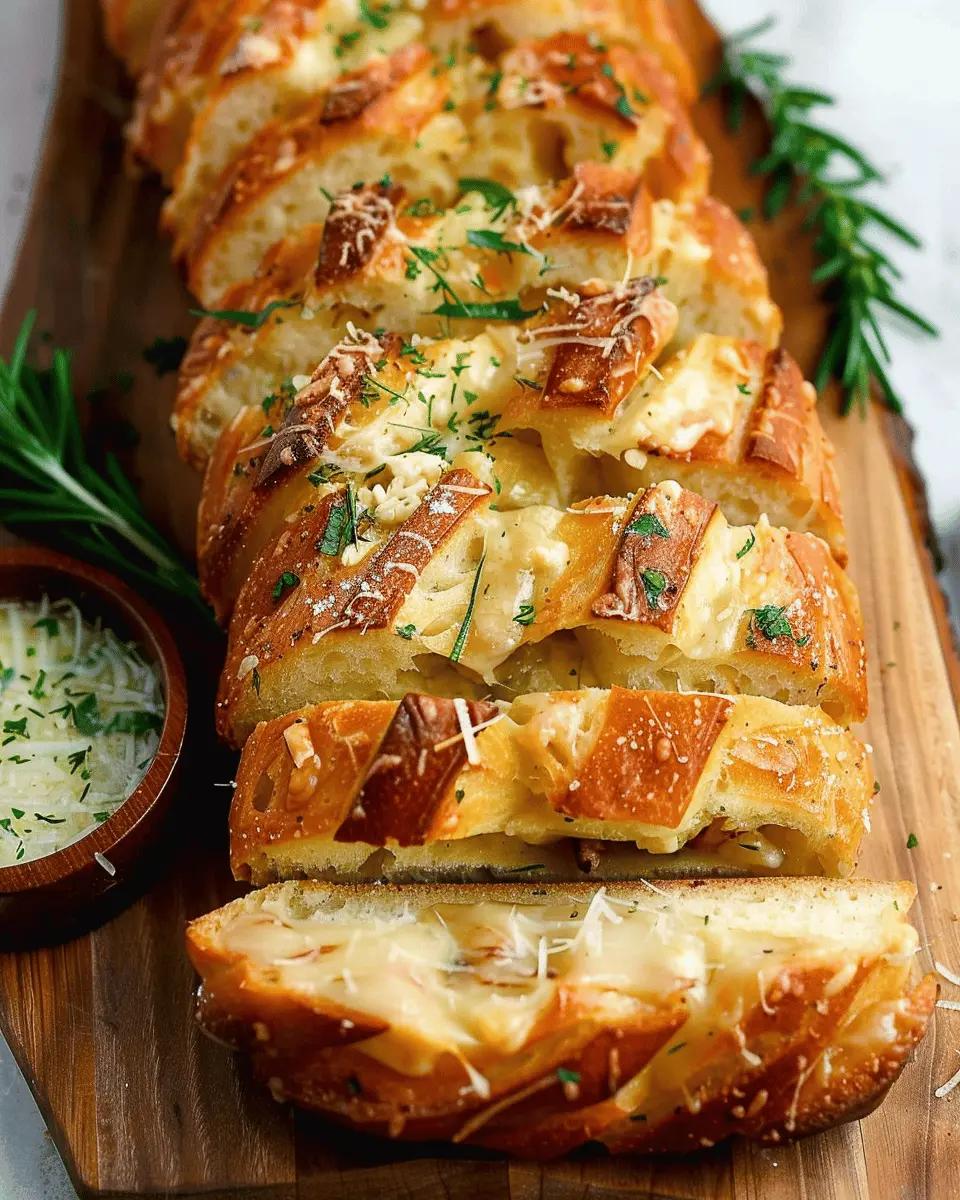
Introduction to Pull Apart Garlic Bread
When the chill of autumn sets in or a rainy day calls for some comfort, pull apart garlic bread is the ultimate cozy dish to have on your table. Every single piece of this delightful bread can be torn off and enjoyed with minimal effort, encouraging a communal atmosphere as you share stories and laughs with friends and family. It’s hard not to fall in love with the melt-in-your-mouth texture and the aromatic embrace of garlic and herbs wafting through your kitchen.
One of the best aspects of this dish is its versatility. You can indulge in it as a side for a hearty bowl of soup or as a snack while watching your favorite show. According to the National Bread and Butter Federation, studies show that comfort foods like garlic bread can uplift your mood, making it a fantastic choice for gatherings or a self-care night at home. It pairs beautifully with a refreshing side salad or even a warm cup of apple cider—ideal for the season!
What makes pull apart garlic bread so special is not just its taste but also how simple it is to prepare. With just a handful of ingredients like fresh garlic, butter, and some herbs, you can whip up this mouthwatering treat in no time. Plus, the customizable nature of this recipe means you can add your favorite ingredients—think turkey bacon or chicken ham—for an extra punch of flavor.
Whether you are a novice in the kitchen or a seasoned chef, creating this dish can be a fun and rewarding experience. As you pull apart each piece, you’ll find yourself delighting in the cheesy, buttery goodness that awaits within. Additionally, if you’re interested in impressing your dinner guests, consider serving it alongside a homemade marinara sauce for dipping.
So, roll up your sleeves and get ready to bake the most delightful pull apart garlic bread that will quickly become a staple in your cooking repertoire!
Ingredients for Pull Apart Garlic Bread
Creating the perfect pull apart garlic bread is all about selecting the right ingredients. Let’s dive into what you’ll need to make this mouthwatering treat.
Essential ingredients for the dough
To get that wonderful, fluffy texture, you’ll need:
- All-purpose flour: The backbone of your dough, giving it structure.
- Active dry yeast: Essential for that light rise; don’t forget to activate it!
- Warm water: Helps wake up the yeast—aim for around 110°F.
- Salt: For flavor; it enhances the overall taste.
- Sugar: Just a pinch helps with fermentation.
- Butter: Adds richness to your dough.
Flavorful filling components
What’s the secret to a pull apart garlic bread that packs a punch? The filling! You’ll want:
- Fresh garlic: Minced, for that aromatic kick.
- Parsley: Fresh or dried, it adds color and a subtle flavor.
- Turkey bacon or chicken ham: For a savory touch, chopped finely.
- Mozzarella cheese: Because what’s bread without cheese?
Optional topping and garnishes
Want to elevate your pull apart garlic bread even more? Consider:
- Parmesan cheese: A sprinkle on top for added flavor.
- Olive oil or melted butter: For brushing before baking.
- Red pepper flakes: If you enjoy a little heat.
- Chopped chives: For garnish once out of the oven.
Feel free to mix and match to suit your taste! The combination of ingredients makes all the difference, so get creative. For more insights on ingredient choices, check out resources from Serious Eats or BBC Good Food. Enjoy the process, and happy baking!
Preparing Pull Apart Garlic Bread
Making your own pull apart garlic bread from scratch is not only satisfying but also surprisingly easy! This homemade version is fluffy, flavorful, and perfect for sharing with friends and family. Here’s a step-by-step guide to help you create this stunning dish that’s sure to impress.
Make the dough
To kick off your pull apart garlic bread adventure, you’ll first want to make a soft, pillowy dough. Here’s what you need:
- 4 cups of all-purpose flour
- 2 teaspoons instant yeast
- 1 teaspoon salt
- 2 tablespoons sugar
- 1 ½ cups warm water (about 110°F)
- 2 tablespoons olive oil
Start by mixing the warm water, sugar, and yeast in a large bowl. Allow it to sit for about 5 minutes until it becomes creamy—this means your yeast is active and ready to work its magic! Next, stir in the olive oil, salt, and flour gradually until it forms a shaggy ball of dough. Want to mix things up? Consider adding fresh herbs like rosemary or thyme for an aromatic touch.
Knead and rise the dough
Now that your dough is ready, it’s time to knead! Dust your countertop with a bit of flour and turn the dough out. Knead for about 8-10 minutes until the dough is smooth and elastic. This process helps build the gluten structure, giving your bread that perfect chew.
Once kneaded, place the dough in a greased bowl, cover it with a clean kitchen towel, and let it rise in a warm, draft-free area until it doubles in size—around 1 to 1.5 hours. Pro tip: If your kitchen is chilly, you can turn on your oven for just a minute to warm it up, then turn it off and let the dough rise in there.
Prepare the filling
While your dough is rising, it’s time to whip up the decadent garlic filling. Combine:
- ½ cup unsalted butter, melted
- 4-6 cloves of minced garlic (adjust to your taste)
- 1 teaspoon dried oregano
- 1 teaspoon dried parsley
- 1 teaspoon garlic powder
- Salt to taste
- Optional: ½ cup shredded mozzarella cheese or turkey bacon bits for that added richness!
Mix all these ingredients in a bowl, ensuring everything is well combined. This filling is the star of the show and adds to the mouthwatering flavor of your pull apart garlic bread.
Assemble the pull apart bread
Once the dough has risen, punch it down gently to deflate it. Roll the dough out on a floured surface into a rectangular shape, about ½ inch thick. Cut the dough into squares, stack a few on top of each other, and dip them into the garlic filling. You can also sprinkle some chicken ham or beef bits, if desired, for a savory twist.
Arrange the stacks in a greased bundt pan or loaf pan, making sure they’re snug but not tightly packed. Pour any remaining garlic butter over the top to ensure every piece gets that flavorful kick.
Second rise and baking
After assembling, cover the pan again and let it rise for another 30-45 minutes. This second rise will make your bread light and fluffy!
While that’s happening, preheat your oven to 350°F (175°C). Once your dough has puffed up, bake it for 25-30 minutes or until golden brown on top and cooked through. The aroma wafting through your kitchen will be nothing short of divine.
After taking it out of the oven, let it cool slightly, then flip it onto a serving plate. Serve warm and watch as your guests eagerly pull apart pieces of this delectable pull apart garlic bread!
For more ideas on delicious side dishes, check out this Great Garlic Bread Guide. Enjoy!
Variations on Pull Apart Garlic Bread
Pull apart garlic bread is a fantastic way to elevate any meal, and the best part is you can get creative with it! Here are some delicious variations you can try.
Cheese-filled Variations
Who doesn’t love gooey, melty cheese? For a twist on traditional pull apart garlic bread, consider adding different types of cheese between the layers.
- Cheddar and Mozzarella: Combine sharp cheddar with stretchy mozzarella for a delightful bite.
- Cream Cheese and Spinach: For a savory touch, mix cream cheese with sautéed spinach.
- Feta and Sun-Dried Tomatoes: This combo adds a Mediterranean flair that pairs beautifully with a side salad.
Herb-infused Options
Herbs can elevate the flavor profile of your pull apart garlic bread, making it feel more gourmet.
- Basil and Parmesan: Swap out garlic for freshly chopped basil and sprinkle some parmesan between layers for an aromatic experience.
- Rosemary and Olive Oil: Infuse olive oil with rosemary and drizzle it over each piece before baking for a fragrant aroma.
- Italian Seasoning Blend: A mix of oregano, thyme, and rosemary brings instant Italian vibes.
Gluten-free Adaptations
Craving that delicious pull apart magic but need a gluten-free version? No problem!
- Look for gluten-free bread or consider making your own from almond or coconut flour.
- The classic garlic and butter mix works beautifully, just ensure your ingredients are certified gluten-free.
With these creative variations, your next batch of pull apart garlic bread can cater to any palate or dietary need, making it an all-time favorite at your dinner table. For even more culinary inspiration and recipes, check out resources like Serious Eats and Bon Appétit to enhance your baking skills. Happy cooking!
Cooking Tips and Notes for Pull Apart Garlic Bread
Ensuring the Dough Rises Well
Achieving the perfect rise is crucial for your pull apart garlic bread. Make sure your yeast is fresh—old yeast won’t activate and could leave your bread flat. A simple trick is to proof your yeast in warm water with a pinch of sugar; it should foam up within a few minutes. Choose a warm, draft-free spot for your dough to rise; consider using your oven (turned off) or a sunny windowsill.
Perfecting the Filling Consistency
For that dreamy, gooey filling, mix softened butter with minced garlic, chopped herbs, and a hint of salt. Ensure the butter isn’t too melted; a spreadable consistency will allow it to hold its shape without making the bread soggy. Aim for a blend that can easily coat your dough pieces without leaking out. If you’re feeling adventurous, try adding some grated cheese or roasted garlic for extra depth.
Best Practices for Baking and Storage
Baking your pull apart garlic bread at the right temperature is key—400°F (200°C) usually works best. To ensure an even bake, consider covering the bread with foil for the first 15 minutes, then removing it to let it brown. Once baked, allow it to cool slightly before digging in. If you have leftovers, store them in an airtight container, and try heating them in the oven instead of the microwave to retain that delicious texture.
For more tips on yeast doughs or delightful filling ideas, check out resources like King Arthur Baking or Food Network. Happy baking!
Serving Suggestions for Pull Apart Garlic Bread
When it comes to enjoying pull apart garlic bread, the possibilities are endless! This delectable treat pairs beautifully with a variety of dishes, making it a versatile addition to your meal plan.
Ideal Pairings for the Bread
- Homemade Soups: A warm bowl of tomato basil or creamy potato soup provides a perfect balance to the richness of the garlic bread. The contrast in textures and flavors is simply delightful.
- Salads: A fresh garden or Caesar salad can cut through the buttery goodness of the bread, making for a well-rounded meal.
- Italian Entrees: Serve it alongside chicken parmesan or spaghetti with marinara sauce for a classic Italian feast that your taste buds will adore.
Creative Serving Ideas
- Dipping Sauces: Create a flavorful dipping station with options like marinara sauce, ranch, or even a tangy balsamic reduction.
- Brunch Favorite: Cut the pull apart garlic bread into smaller pieces and serve it as a brunch finger food with a side of scrambled eggs and turkey bacon.
- Charcuterie Board Addition: Slice it for a charcuterie board, adding a unique garlic twist that complements meats and cheeses well.
By incorporating these serving suggestions, you’ll elevate your garlic bread experience, ensuring it’s not just a side dish, but a star player at your table. Satisfy your cravings and impress your guests with these mouthwatering ideas! For more tips on food pairings, check out AllRecipes or Food Network for inspiration.
Time Breakdown for Pull Apart Garlic Bread
When diving into the delightful world of pull apart garlic bread, understanding the time commitment can help you plan better. Here’s a quick breakdown to keep things smooth and organized.
Preparation time
Getting your ingredients together and prepping the dough will take about 15-20 minutes. This includes mixing and kneading to ensure everything is well incorporated.
Rising time
Let the dough rise until it doubles in size, which usually takes around 1-1.5 hours. This is a great moment to catch up on a show or whip up a side salad.
Baking time
Once the dough is shaped, you’ll bake your pull apart garlic bread for 25-30 minutes, allowing that rich, garlicky aroma to fill your kitchen.
Total time
Overall, you’re looking at about 2-2.5 hours from start to finish. But don’t let that discourage you! Much of that time is hands-off, making it perfect for a cozy evening at home.
For more tips on baking bread, check out resources from King Arthur Baking.
Nutritional Facts for Pull Apart Garlic Bread
When it comes to pull apart garlic bread, it’s not just about the mouthwatering taste—understanding its nutritional profile can enhance your dining experience. Here’s a quick look at the breakdown:
Calories
A serving of homemade pull apart garlic bread typically contains around 150-200 calories. This can vary based on the type of bread used and the amount of butter or cheese added.
Protein
You can expect about 4-5 grams of protein per serving. While not a massive source of protein, pairing your garlic bread with a protein-rich dip or a side of chicken could balance your meal nicely.
Sodium
Be mindful of sodium content, which can range from 300-400 mg per serving. Opting for low-sodium butter or spices can help keep these numbers in check.
For more detailed insights on nutrition, check out resources like the USDA FoodData Central which provides comprehensive food information.
Enjoying this fluffy, garlicky delight can be a part of a balanced diet when consumed in moderation! Have you thought about pairing it with a fresh salad next time?
FAQs about Pull Apart Garlic Bread
Pull apart garlic bread is not only delicious but also a versatile companion to many meals. Here are some commonly asked questions to help you master this culinary delight.
Can I make pull apart garlic bread ahead of time?
Absolutely! You can prepare your pull apart garlic bread dough a day ahead. After kneading, let it rise in the fridge overnight. Just remember to bring it back to room temperature and allow it to rise a bit more before baking. This method can even enhance the flavors, thanks to the slow fermentation process!
How can I store leftovers?
If you’ve managed to have leftovers (lucky you!), storing your pull apart garlic bread is simple. Wrap it tightly in foil or plastic wrap, or place it in an airtight container. You can keep it at room temperature for a couple of days or in the fridge for up to a week. For extended freshness, consider freezing it. Just slice it up before freezing, making it easier to grab a piece whenever the craving hits!
What if my dough doesn’t rise?
Don’t panic! A yeast issue could be the culprit. Make sure your yeast is fresh—activated yeast should bubble in warm water, not exceed 110°F (43°C). If it doesn’t rise, try kneading it a bit longer or give it a warmer spot for rising. Drafts can hinder rising too, so keep your dough in a warm, draft-free area.
For tips on working with yeast, check out this helpful guide from King Arthur Baking. Remember, baking is a learning experience, so don’t be discouraged!
Conclusion on Pull Apart Garlic Bread
Pull apart garlic bread is a delightful addition to any homemade meal. It’s not just bread; it’s an experience that brings people together around the dinner table. The combination of warm, fluffy bread infused with garlic and butter makes it a comforting staple you won’t soon forget.
Whether you’re hosting a casual gathering or enjoying a cozy night in, this pull apart garlic bread complements various dishes, from hearty soups to succulent salads. Plus, it’s a fun and interactive way to share food. Don’t miss out on the joy it can bring to your meals!
For additional cooking inspiration, check out BBC Good Food for more savory recipes that can accompany your homemade garlic bread.
PrintPull Apart Garlic Bread: The Best Comfort Food for Sharing
Pull Apart Garlic Bread is the perfect comfort food for sharing with family and friends.
- Prep Time: 10 minutes
- Cook Time: 25 minutes
- Total Time: 35 minutes
- Yield: 8 servings 1x
- Category: Appetizer
- Method: Baking
- Cuisine: American
- Diet: Vegetarian
Ingredients
- 1 loaf bread
- 1/2 cup unsalted butter
- 4 cloves garlic, minced
- 1/4 cup fresh parsley, chopped
- 1 cup mozzarella cheese, shredded
Instructions
- Preheat your oven to 350°F (175°C).
- In a saucepan, melt the butter and add minced garlic.
- Stir in chopped parsley.
- Make cuts in the bread without slicing all the way through.
- Pour the garlic butter mixture into the cuts.
- Stuff cheese into the cuts.
- Wrap in foil and bake for 15 minutes.
- Unwrap and bake an additional 10 minutes until golden.
Notes
- Serve warm for the best flavor.
- Experiment with different cheeses for variety.
Nutrition
- Serving Size: 1 piece
- Calories: 250
- Sugar: 1g
- Sodium: 450mg
- Fat: 18g
- Saturated Fat: 10g
- Unsaturated Fat: 6g
- Trans Fat: 0g
- Carbohydrates: 20g
- Fiber: 1g
- Protein: 4g
- Cholesterol: 30mg
Keywords: Pull Apart Garlic Bread, comfort food, sharing